> ## Documentation Index
> Fetch the complete documentation index at: https://docs.tread.ai/llms.txt
> Use this file to discover all available pages before exploring further.
# Dispatch a Job (Web & Mobile)
> Assign, configure, send, and monitor jobs from the web dashboard, or dispatch on the go from the mobile app — then see what your driver does to accept and start the job.
Dispatching works on **both surfaces**. Assign, configure, send, and monitor jobs from the **web** dashboard, or dispatch on the go from the **mobile** app. Either way, your driver receives and starts the job on their phone.
Click **Assign** on the job row to open the panel, then choose who hauls the job.
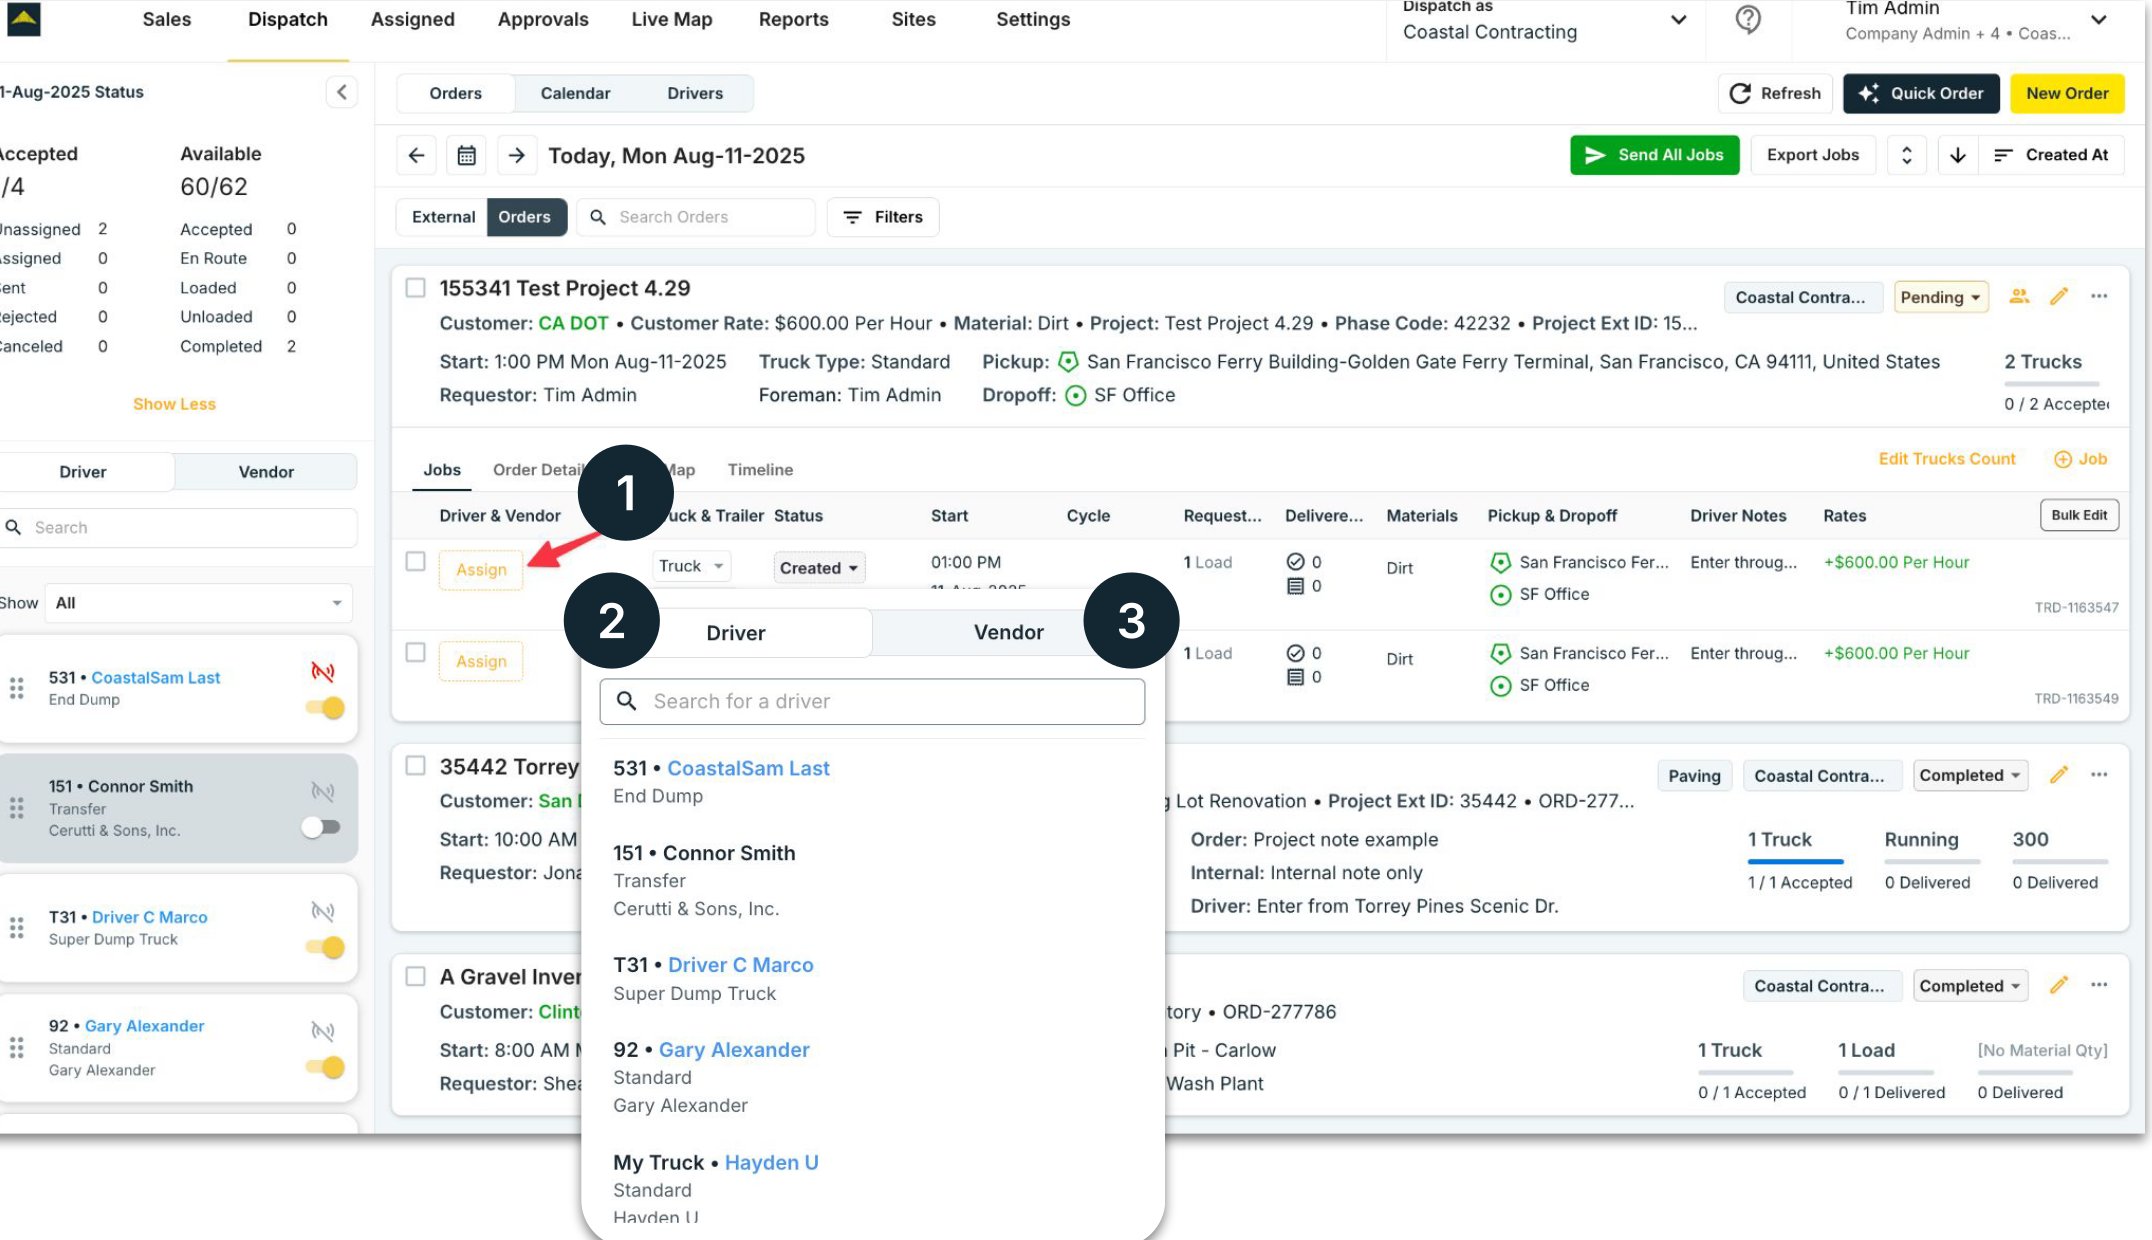 1. **Assign** — opens the Driver / Vendor picker on the job row.
2. **Driver** — assign one of your own drivers (an Internal Driver), or a driver a partner shares to you (a Shared Driver, often an Owner-Operator). Search by name or truck number.
3. **Vendor** — hand the job to a hauling company that will sub-dispatch it to their own driver.
## Bulk assign
To give many jobs to one hauling company at once:
1. **Assign** — opens the Driver / Vendor picker on the job row.
2. **Driver** — assign one of your own drivers (an Internal Driver), or a driver a partner shares to you (a Shared Driver, often an Owner-Operator). Search by name or truck number.
3. **Vendor** — hand the job to a hauling company that will sub-dispatch it to their own driver.
## Bulk assign
To give many jobs to one hauling company at once:
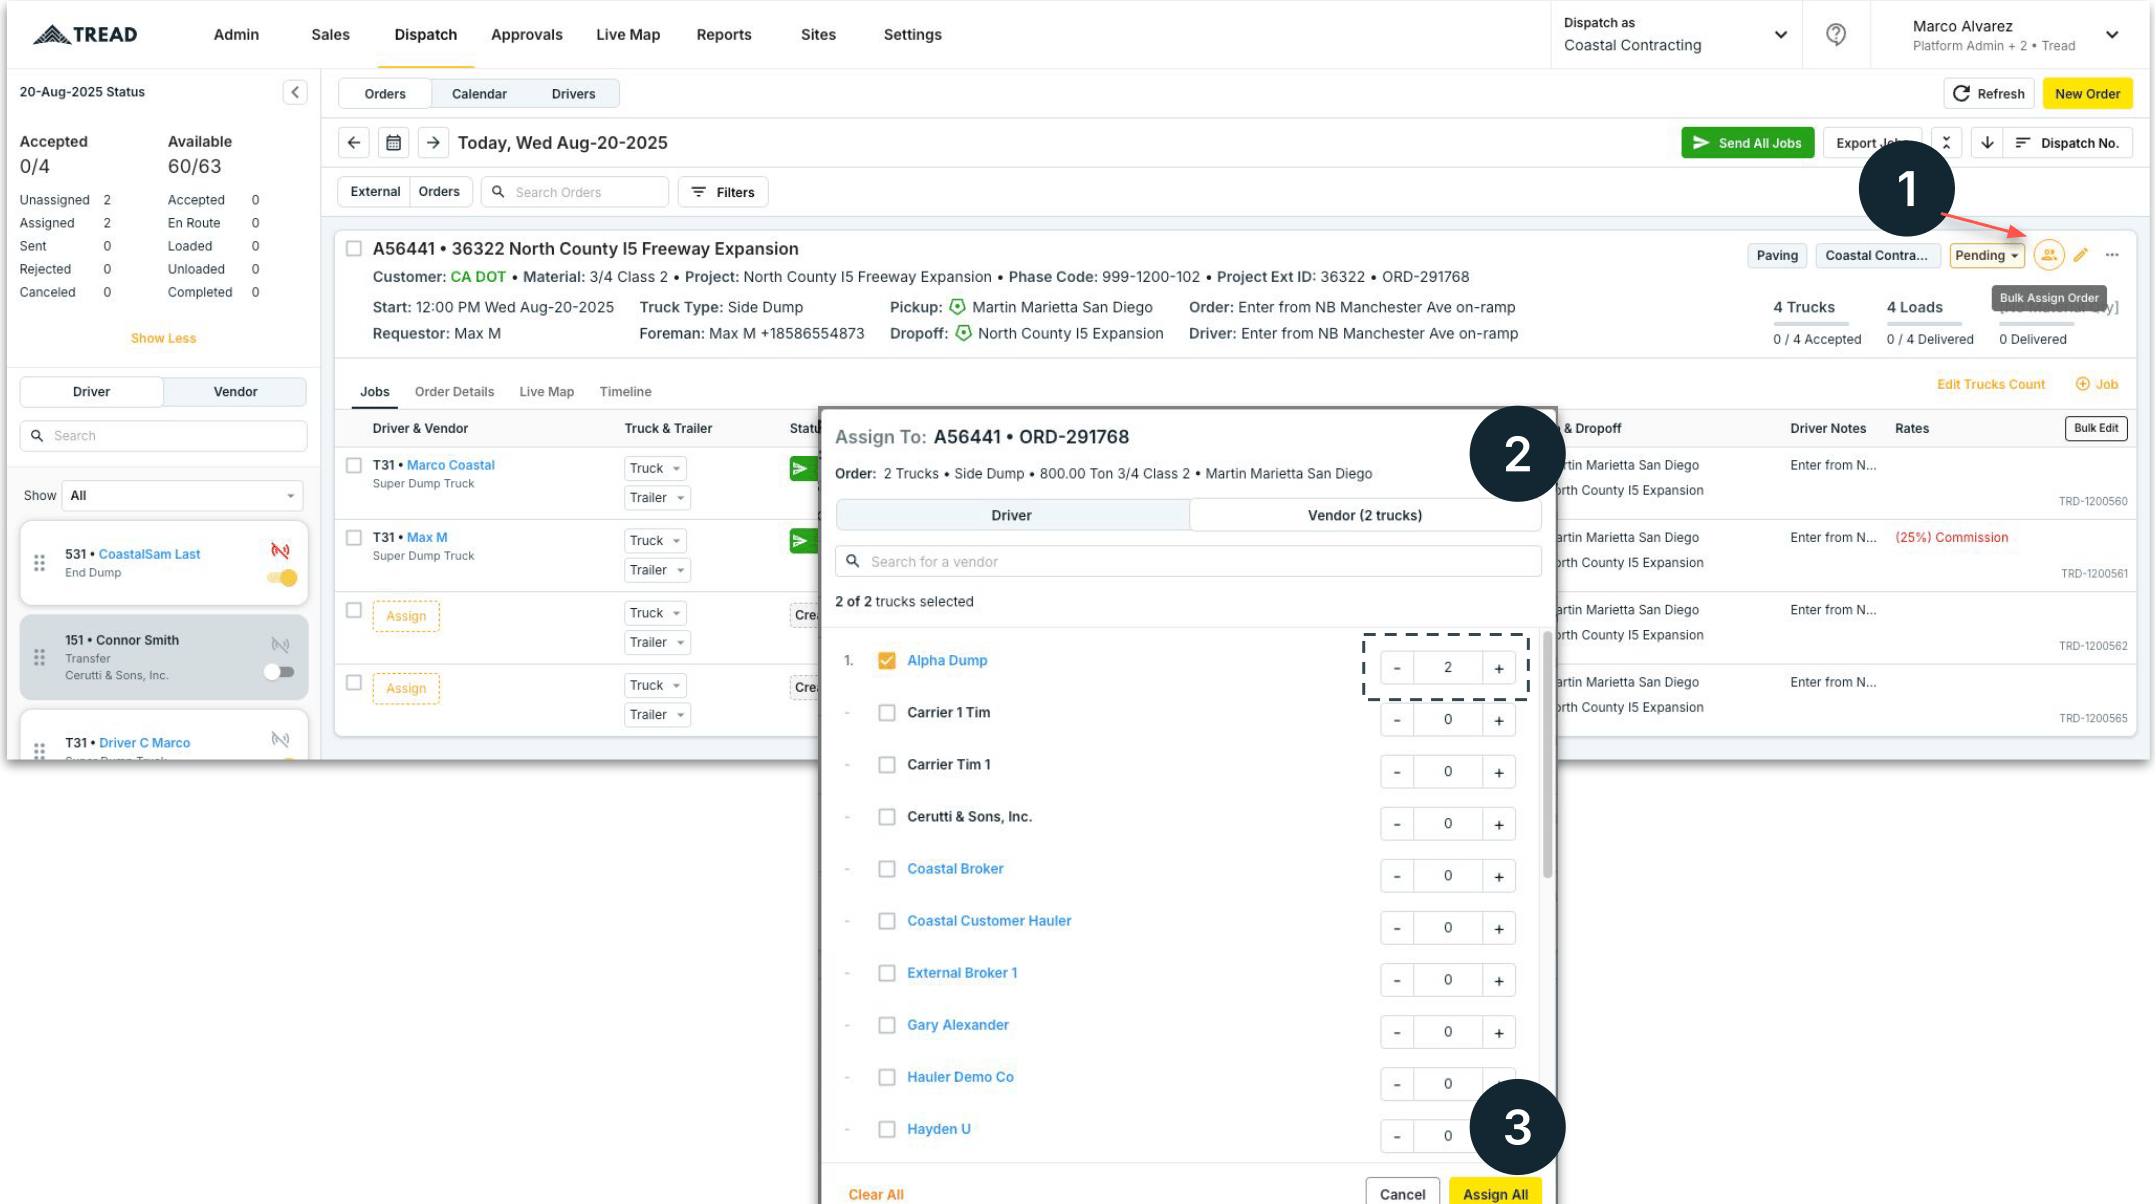 1. Click the **Bulk Assign** (persons) icon at the top right to open the *Assign to* dialog.
2. Use **+** to set the number of trucks for the selected vendor.
3. Click **Assign All** to assign every selected job to that vendor at once.
Click **Send** on a single row to dispatch that driver, or **Send All Jobs** at the top to send every pending assignment at once. Drivers receive a push notification immediately.
1. Click the **Bulk Assign** (persons) icon at the top right to open the *Assign to* dialog.
2. Use **+** to set the number of trucks for the selected vendor.
3. Click **Assign All** to assign every selected job to that vendor at once.
Click **Send** on a single row to dispatch that driver, or **Send All Jobs** at the top to send every pending assignment at once. Drivers receive a push notification immediately.
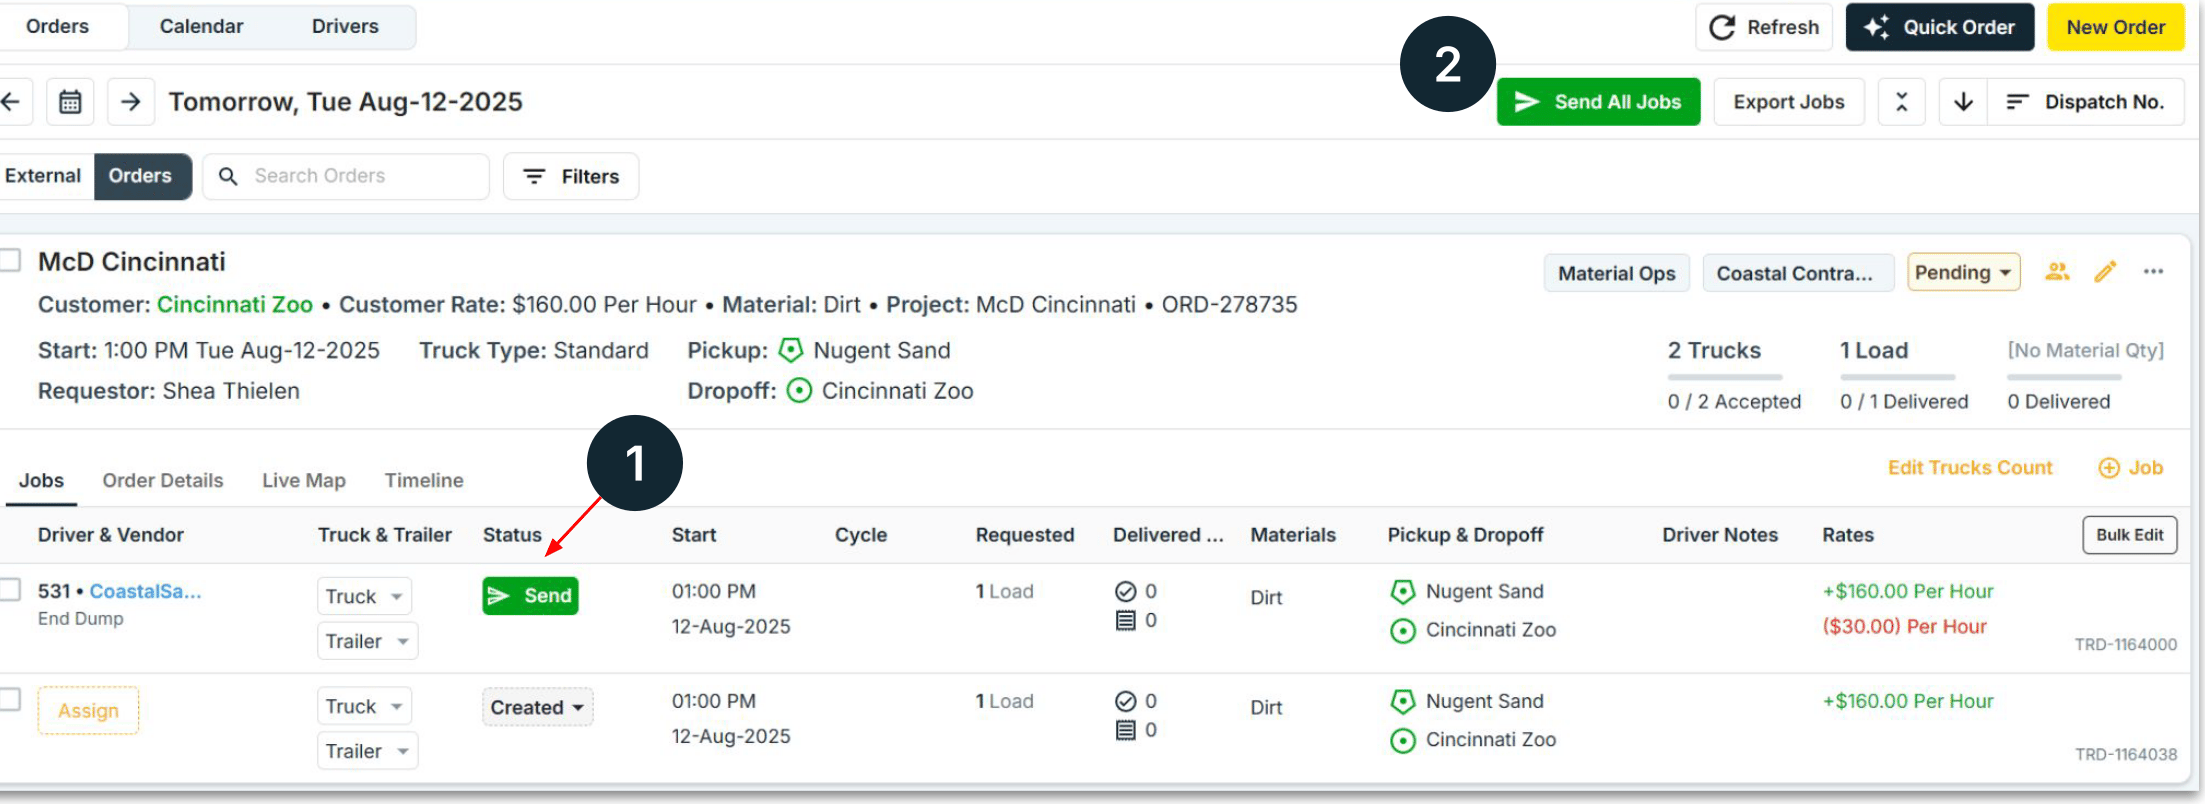 **Send All Jobs** dispatches **every job with an assignment**. Double-check the list before clicking — drivers are notified instantly.
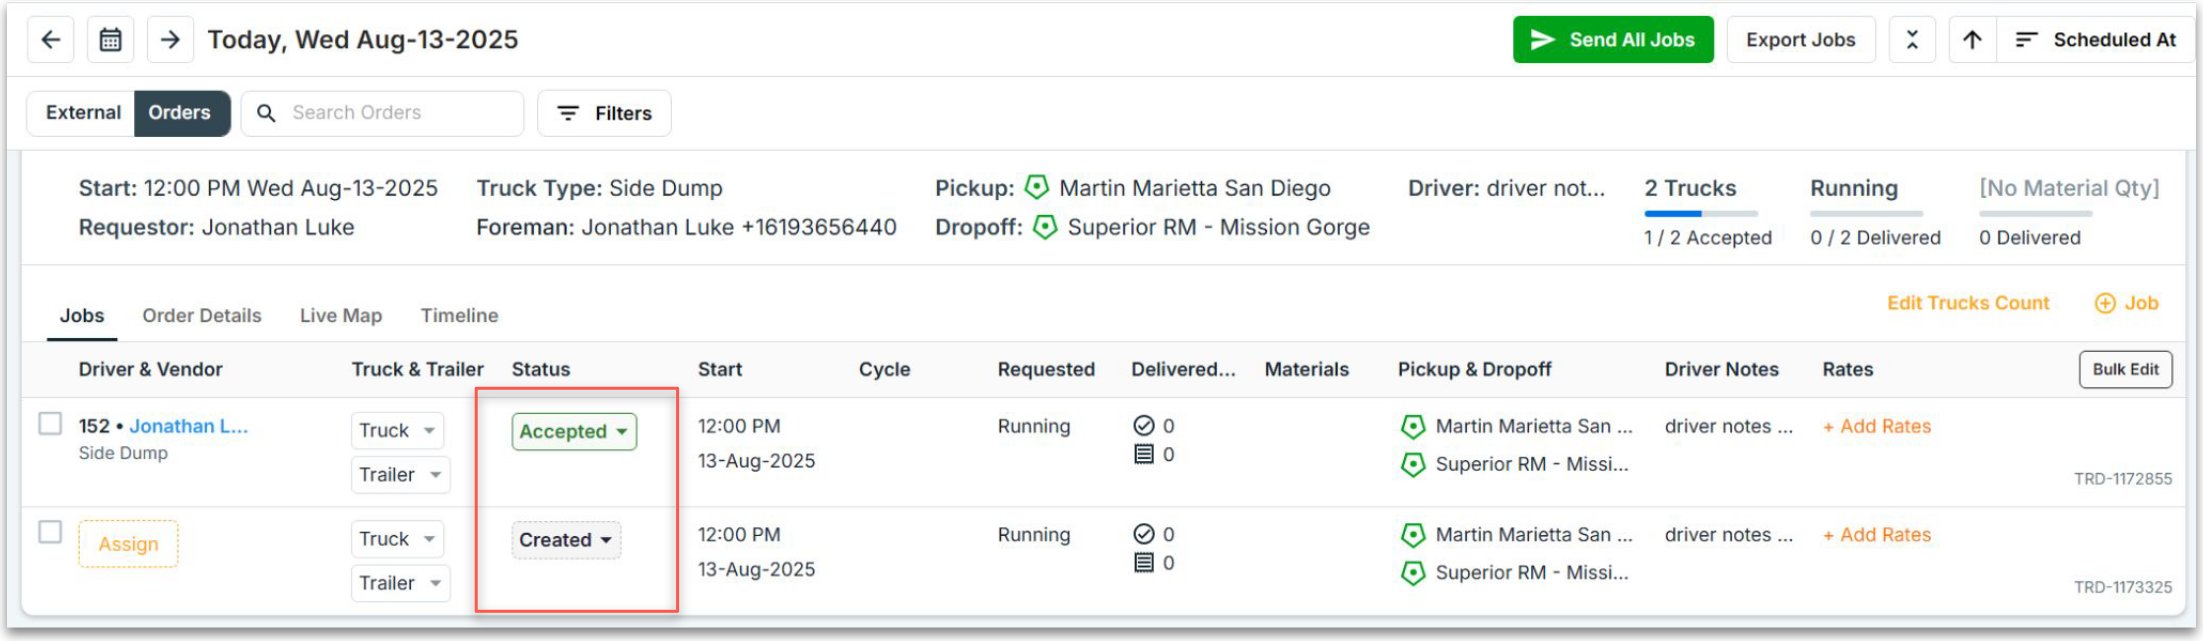
Follow each job's **Status** as the day runs: *Accepted → To Pickup → At Pickup → Loaded → To Dropoff → At Dropoff → Unloaded → In Review → Completed*. You can manually advance a status by clicking the down arrow in the status box, and follow trucks on the **Live Map**.
**Send All Jobs** dispatches **every job with an assignment**. Double-check the list before clicking — drivers are notified instantly.
Follow each job's **Status** as the day runs: *Accepted → To Pickup → At Pickup → Loaded → To Dropoff → At Dropoff → Unloaded → In Review → Completed*. You can manually advance a status by clicking the down arrow in the status box, and follow trucks on the **Live Map**.
 See [Track Drivers & Collect Tickets](/workflows/track-drivers-collect-tickets) for what comes next.
## Dispatch from mobile
You can run the same dispatch from the Tread mobile app — useful when you're away from your desk. Open the **Dispatch** tab to see the day's orders.
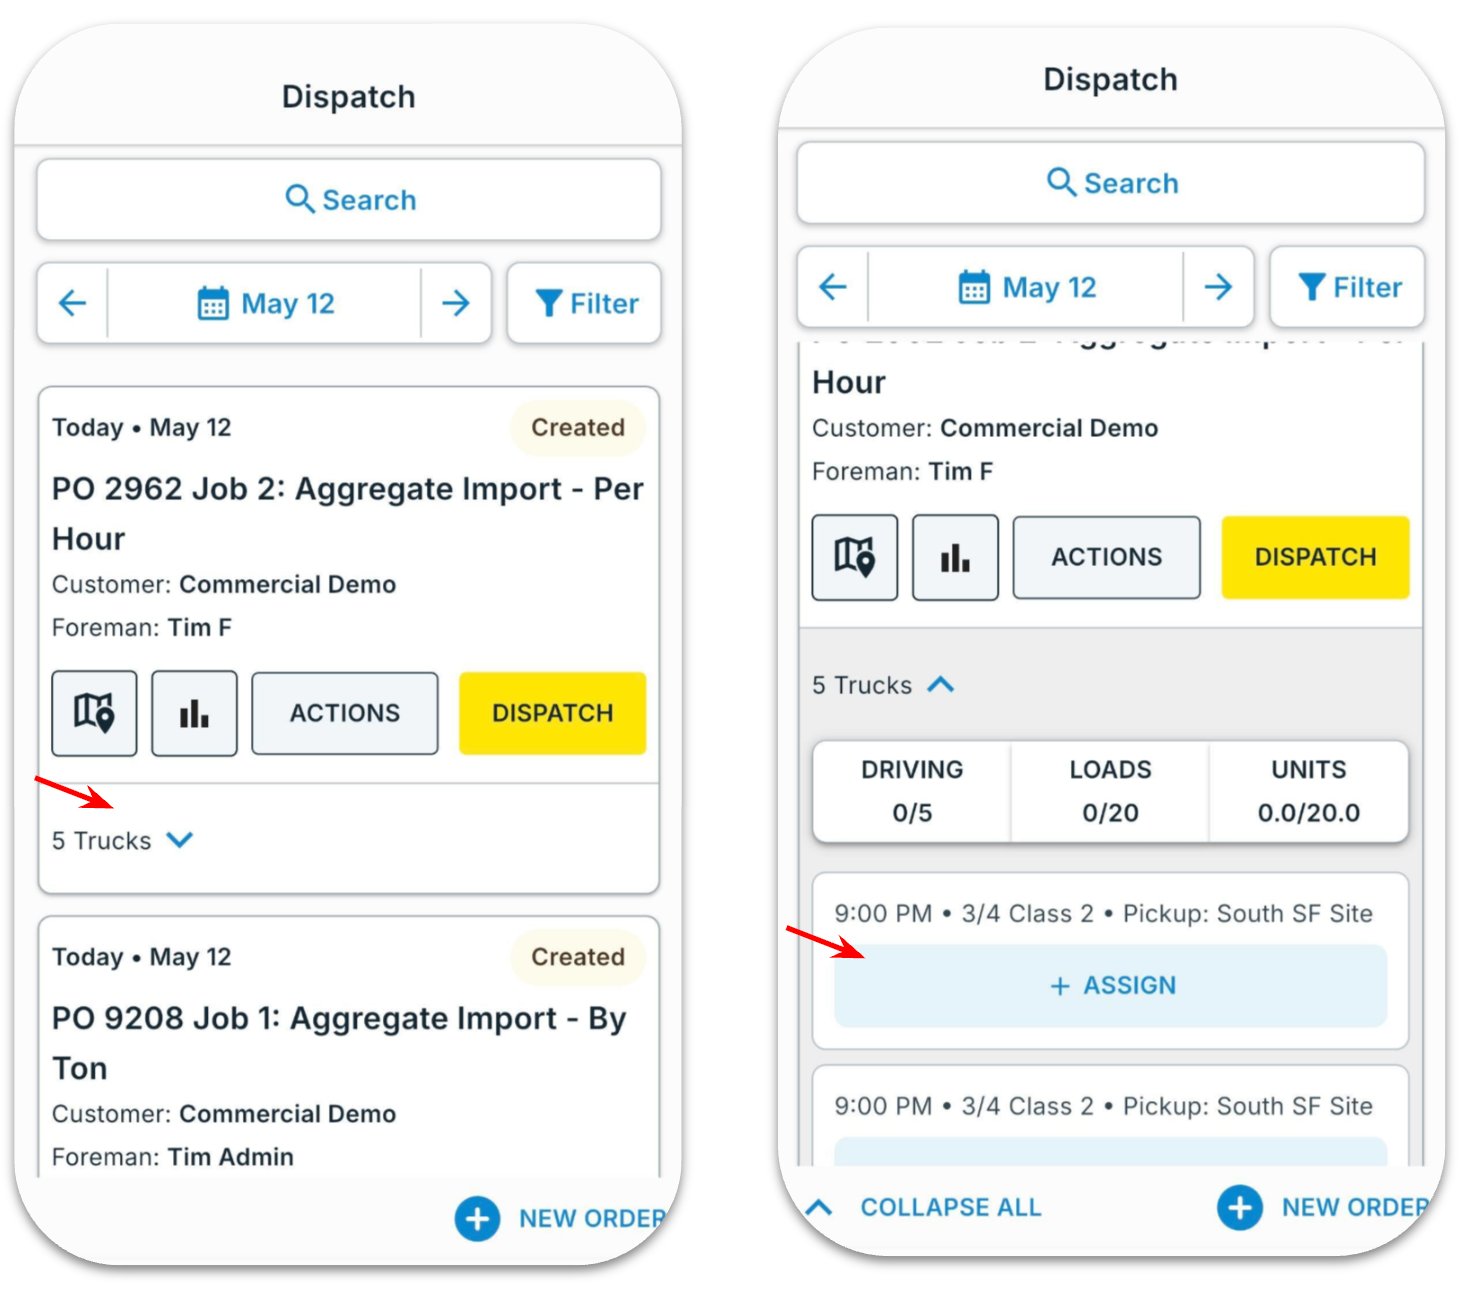
Tap the **▼** arrow next to the order's truck count to see the assigned trucks, then tap **+ Assign** to start adding a driver.
See [Track Drivers & Collect Tickets](/workflows/track-drivers-collect-tickets) for what comes next.
## Dispatch from mobile
You can run the same dispatch from the Tread mobile app — useful when you're away from your desk. Open the **Dispatch** tab to see the day's orders.
Tap the **▼** arrow next to the order's truck count to see the assigned trucks, then tap **+ Assign** to start adding a driver.
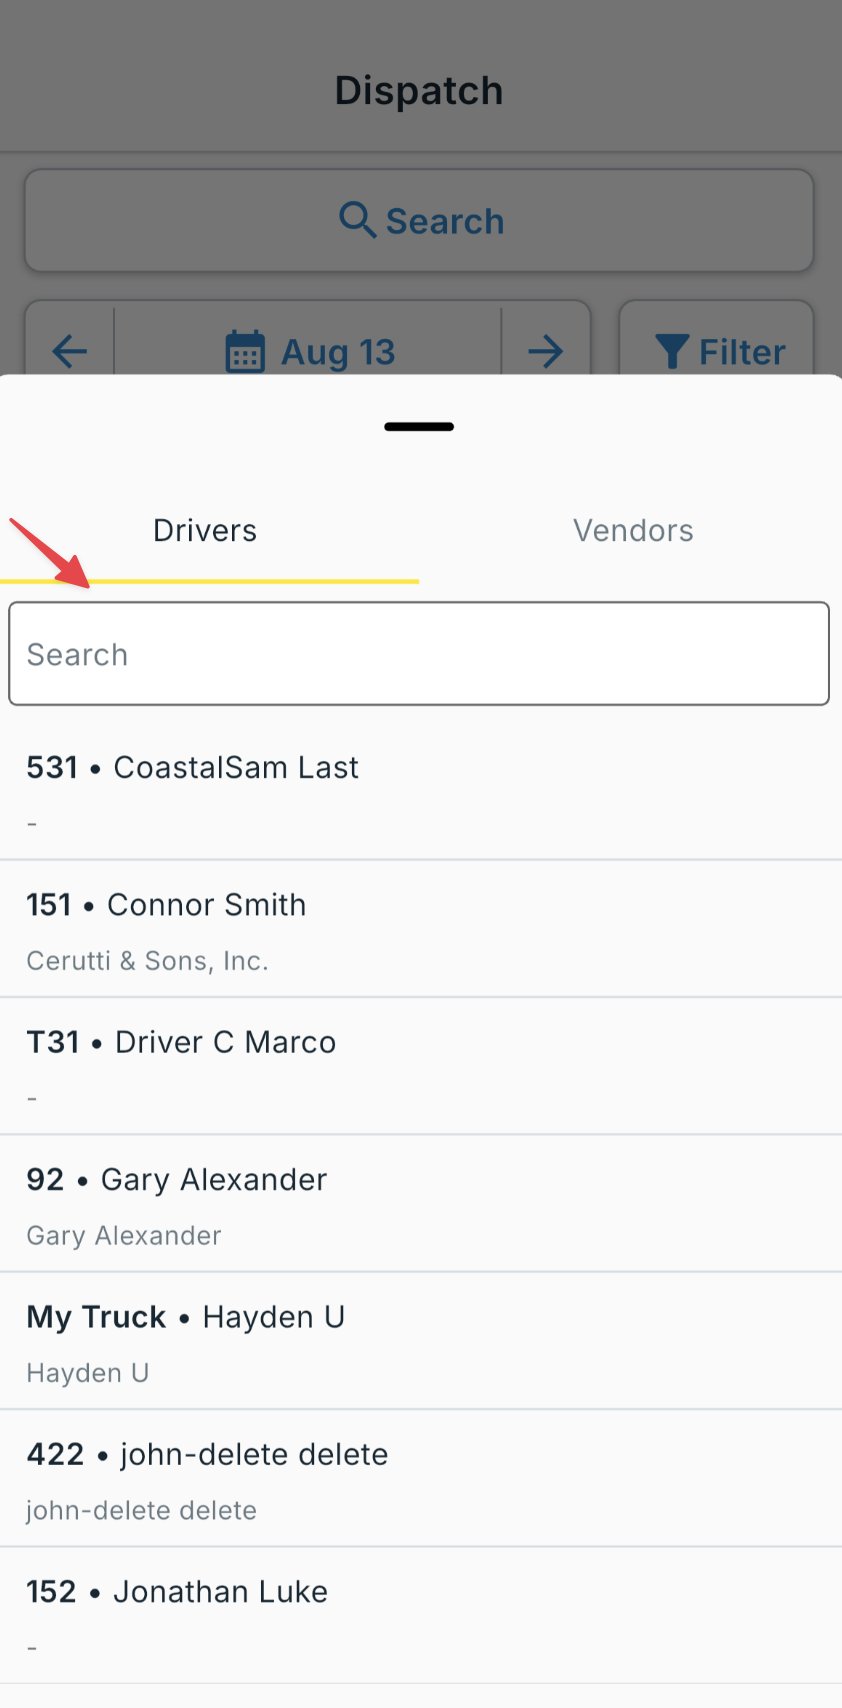
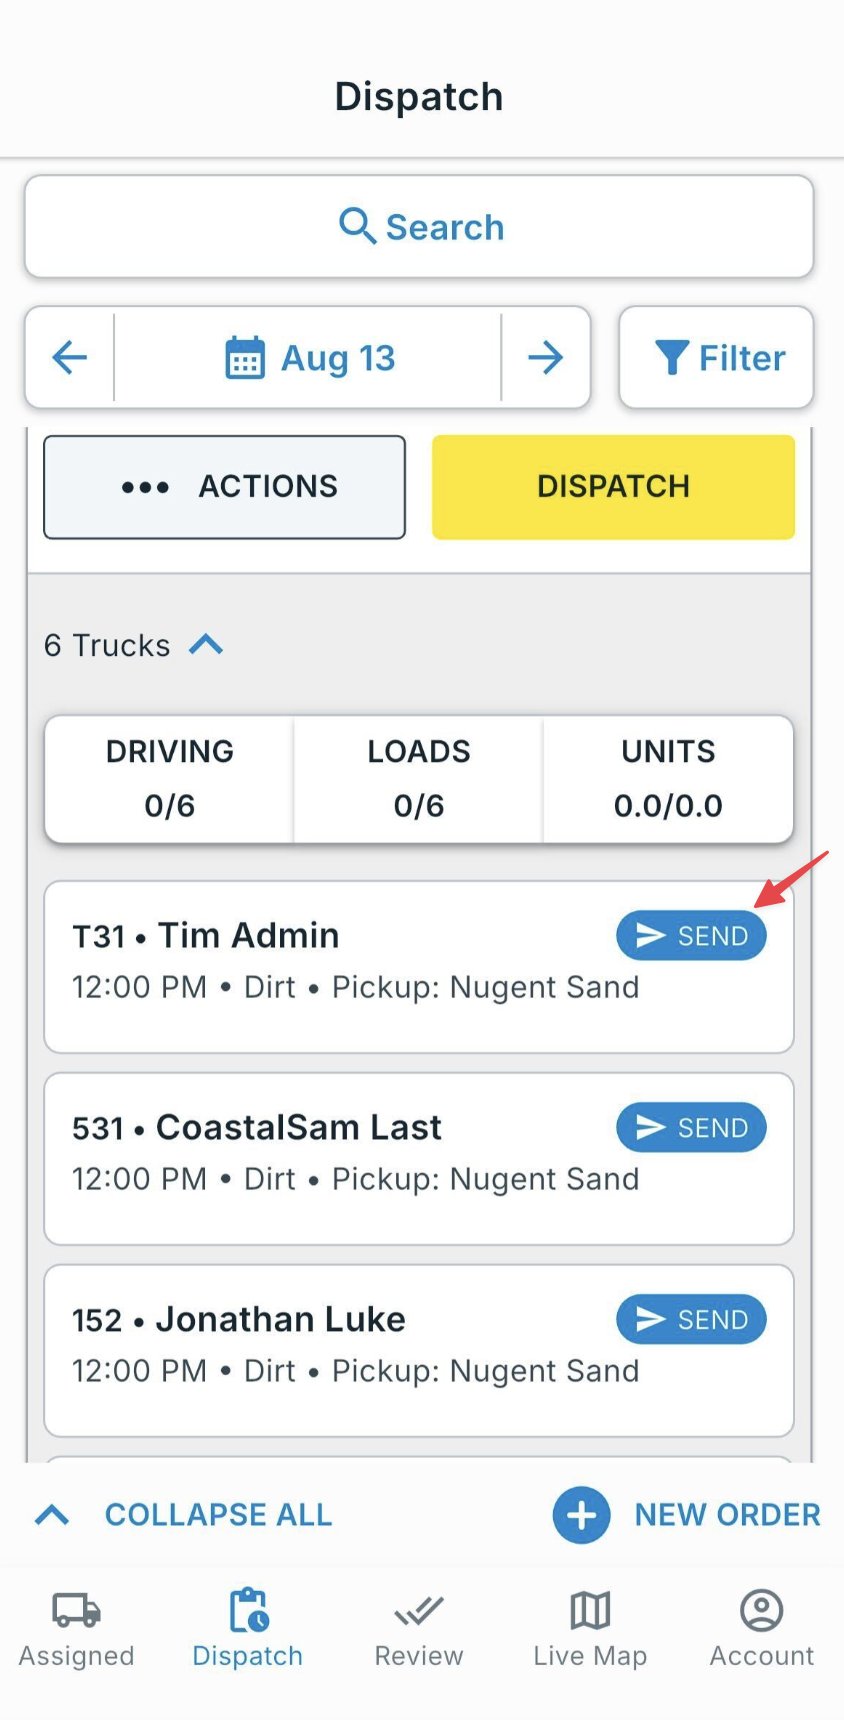
 Search for a driver by name or truck number, tap to select, then tap **Send**. The driver gets a push notification immediately and can accept and start the job from their phone.
 You'll see the driver's location on the map as soon as they start the job.
Once you send a job, the assigned driver gets it on their phone. Here's what they do:
New offers appear in the driver's **Assigned** tab under **New Tread Requests**. The driver taps **View Request** to see the job details.
You'll see the driver's location on the map as soon as they start the job.
Once you send a job, the assigned driver gets it on their phone. Here's what they do:
New offers appear in the driver's **Assigned** tab under **New Tread Requests**. The driver taps **View Request** to see the job details.
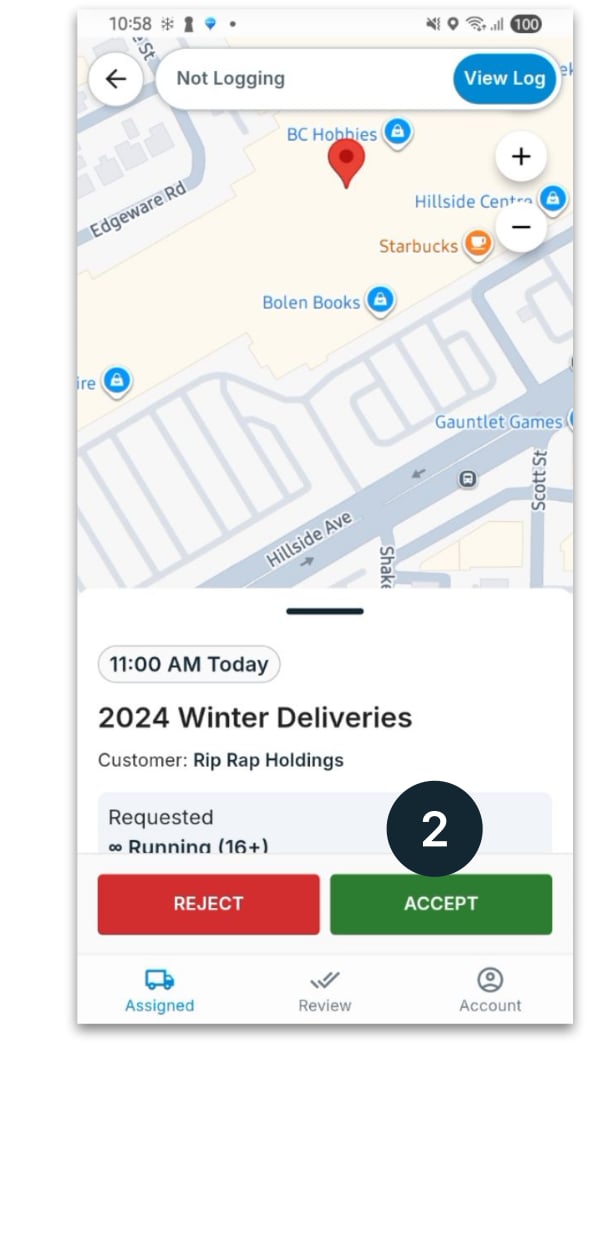
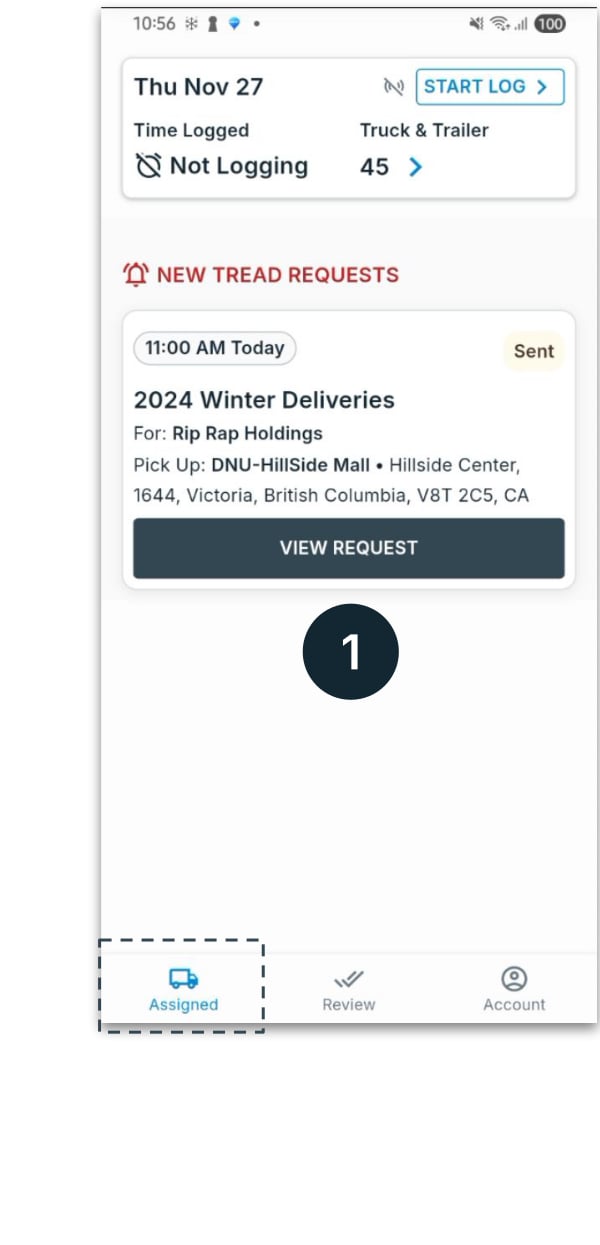 The driver reviews the pickup, drop-off, and material, then taps **Accept** (or **Decline**). Until they respond, you'll see their status as **Pending** on your board.
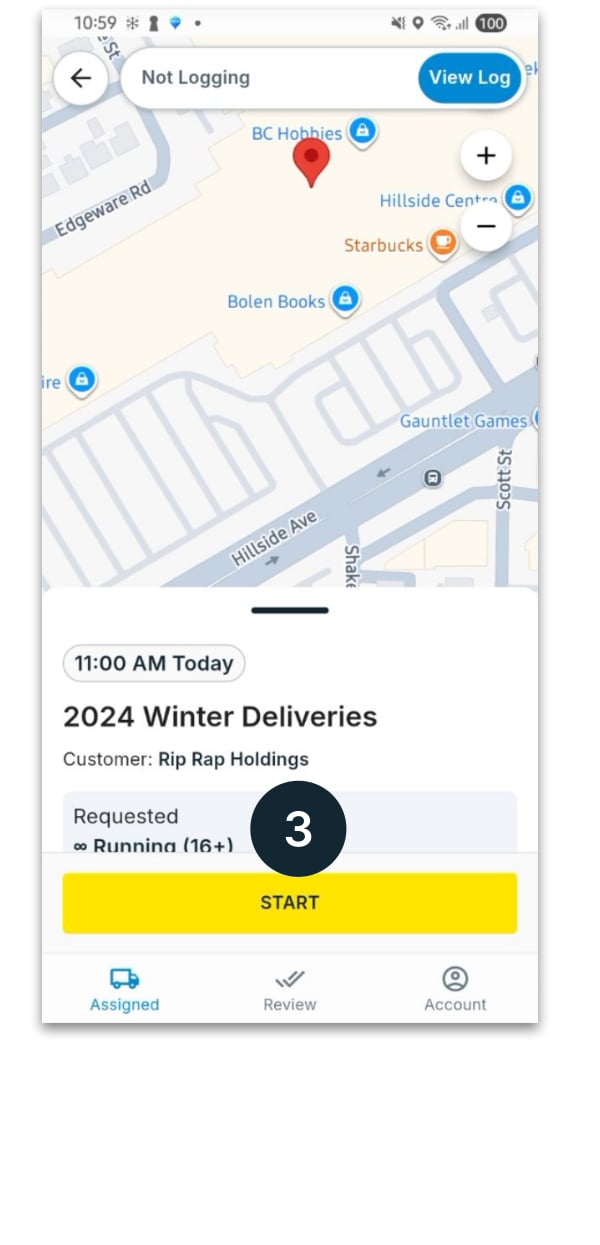
 The driver taps **Start** to begin the run. Their location now appears on your **Live Map**, and the job's status starts moving through the flow.
 ## Tips & common pitfalls
**Assign to the right place.** Use the **Driver** tab for your own drivers and shared drivers, and **Vendor** for haulers who sub-dispatch. Picking the wrong one is the most common reason a driver never receives a load. See [Dispatching to Drivers and Vendors](/concepts/dispatching-drivers-vendors).
* **Driver didn't get the load?** Check the job status — if it's stuck at **Assigned** (not **Sent**), you still need to hit **Send**. If it's sent but the driver shows **Pending**, they haven't accepted yet, or they may not have the app or location permissions ([Train Your Drivers](/vendor-guide/train-your-drivers)).
* **Vendor jobs** show the driver's name on your board only *after* the vendor's dispatcher accepts and assigns one of their drivers.
* Set a **default truck** on each driver so it pre-fills on every assignment — fewer clicks, fewer mistakes.
## Related
* [Dispatch Overview](/dispatch-guide/overview) — the board, modes, and prerequisites
* [Dispatching to Drivers and Vendors](/concepts/dispatching-drivers-vendors) — internal, shared, and vendor drivers
* [Track Drivers & Collect Tickets](/workflows/track-drivers-collect-tickets) — after the job is sent
* [Orders & Projects](/concepts/orders-projects) — what you're dispatching
## Tips & common pitfalls
**Assign to the right place.** Use the **Driver** tab for your own drivers and shared drivers, and **Vendor** for haulers who sub-dispatch. Picking the wrong one is the most common reason a driver never receives a load. See [Dispatching to Drivers and Vendors](/concepts/dispatching-drivers-vendors).
* **Driver didn't get the load?** Check the job status — if it's stuck at **Assigned** (not **Sent**), you still need to hit **Send**. If it's sent but the driver shows **Pending**, they haven't accepted yet, or they may not have the app or location permissions ([Train Your Drivers](/vendor-guide/train-your-drivers)).
* **Vendor jobs** show the driver's name on your board only *after* the vendor's dispatcher accepts and assigns one of their drivers.
* Set a **default truck** on each driver so it pre-fills on every assignment — fewer clicks, fewer mistakes.
## Related
* [Dispatch Overview](/dispatch-guide/overview) — the board, modes, and prerequisites
* [Dispatching to Drivers and Vendors](/concepts/dispatching-drivers-vendors) — internal, shared, and vendor drivers
* [Track Drivers & Collect Tickets](/workflows/track-drivers-collect-tickets) — after the job is sent
* [Orders & Projects](/concepts/orders-projects) — what you're dispatching