> ## Documentation Index
> Fetch the complete documentation index at: https://docs.tread.ai/llms.txt
> Use this file to discover all available pages before exploring further.
# Dispatch Overview
> How a job gets from your dispatch board to your driver's phone — the board, assigning to your own drivers or a vendor, and what you need before you start.
Dispatching is the day-to-day act of getting your work onto the right driver's phone. You can dispatch from the **web** dashboard or the **mobile** app — assign, send, and monitor jobs on either surface — and your drivers receive, accept, and start those jobs on their phones.
New to Tread? Set up your trucks, drivers, and users first — see [Set Up Trucks & Drivers](/vendor-guide/setup-trucks-and-drivers). Then come back here to dispatch.
## What you dispatch
A **Project** represents the construction project, (a multi-day scope of work) and can be viewed as a template for daily work; an **Order** is the daily trucking or material request you actually dispatch. You assign and send the **jobs (TRDs or truck dispatches**) under an order. If you haven't created the work yet, start with [Create a Project, Order & Dispatch](/workflows/create-a-project).
| Concept | Role in dispatch |
| ----------- | ------------------------------------------------------------------ |
| **Project** | Holds the customer, sites, materials, and rates |
| **Order** | The day's work: trucks requested, start time, target loads/hours |
| **Job** | One truck's assignment within an order — what you send to a driver |
## The dispatch view
The **Dispatch** view (on web, and the **Dispatch** tab on mobile) is your command center for the day. Each order card shows its status, truck count, and the per-job rows you act on — assign a driver, send the job, and track its status.
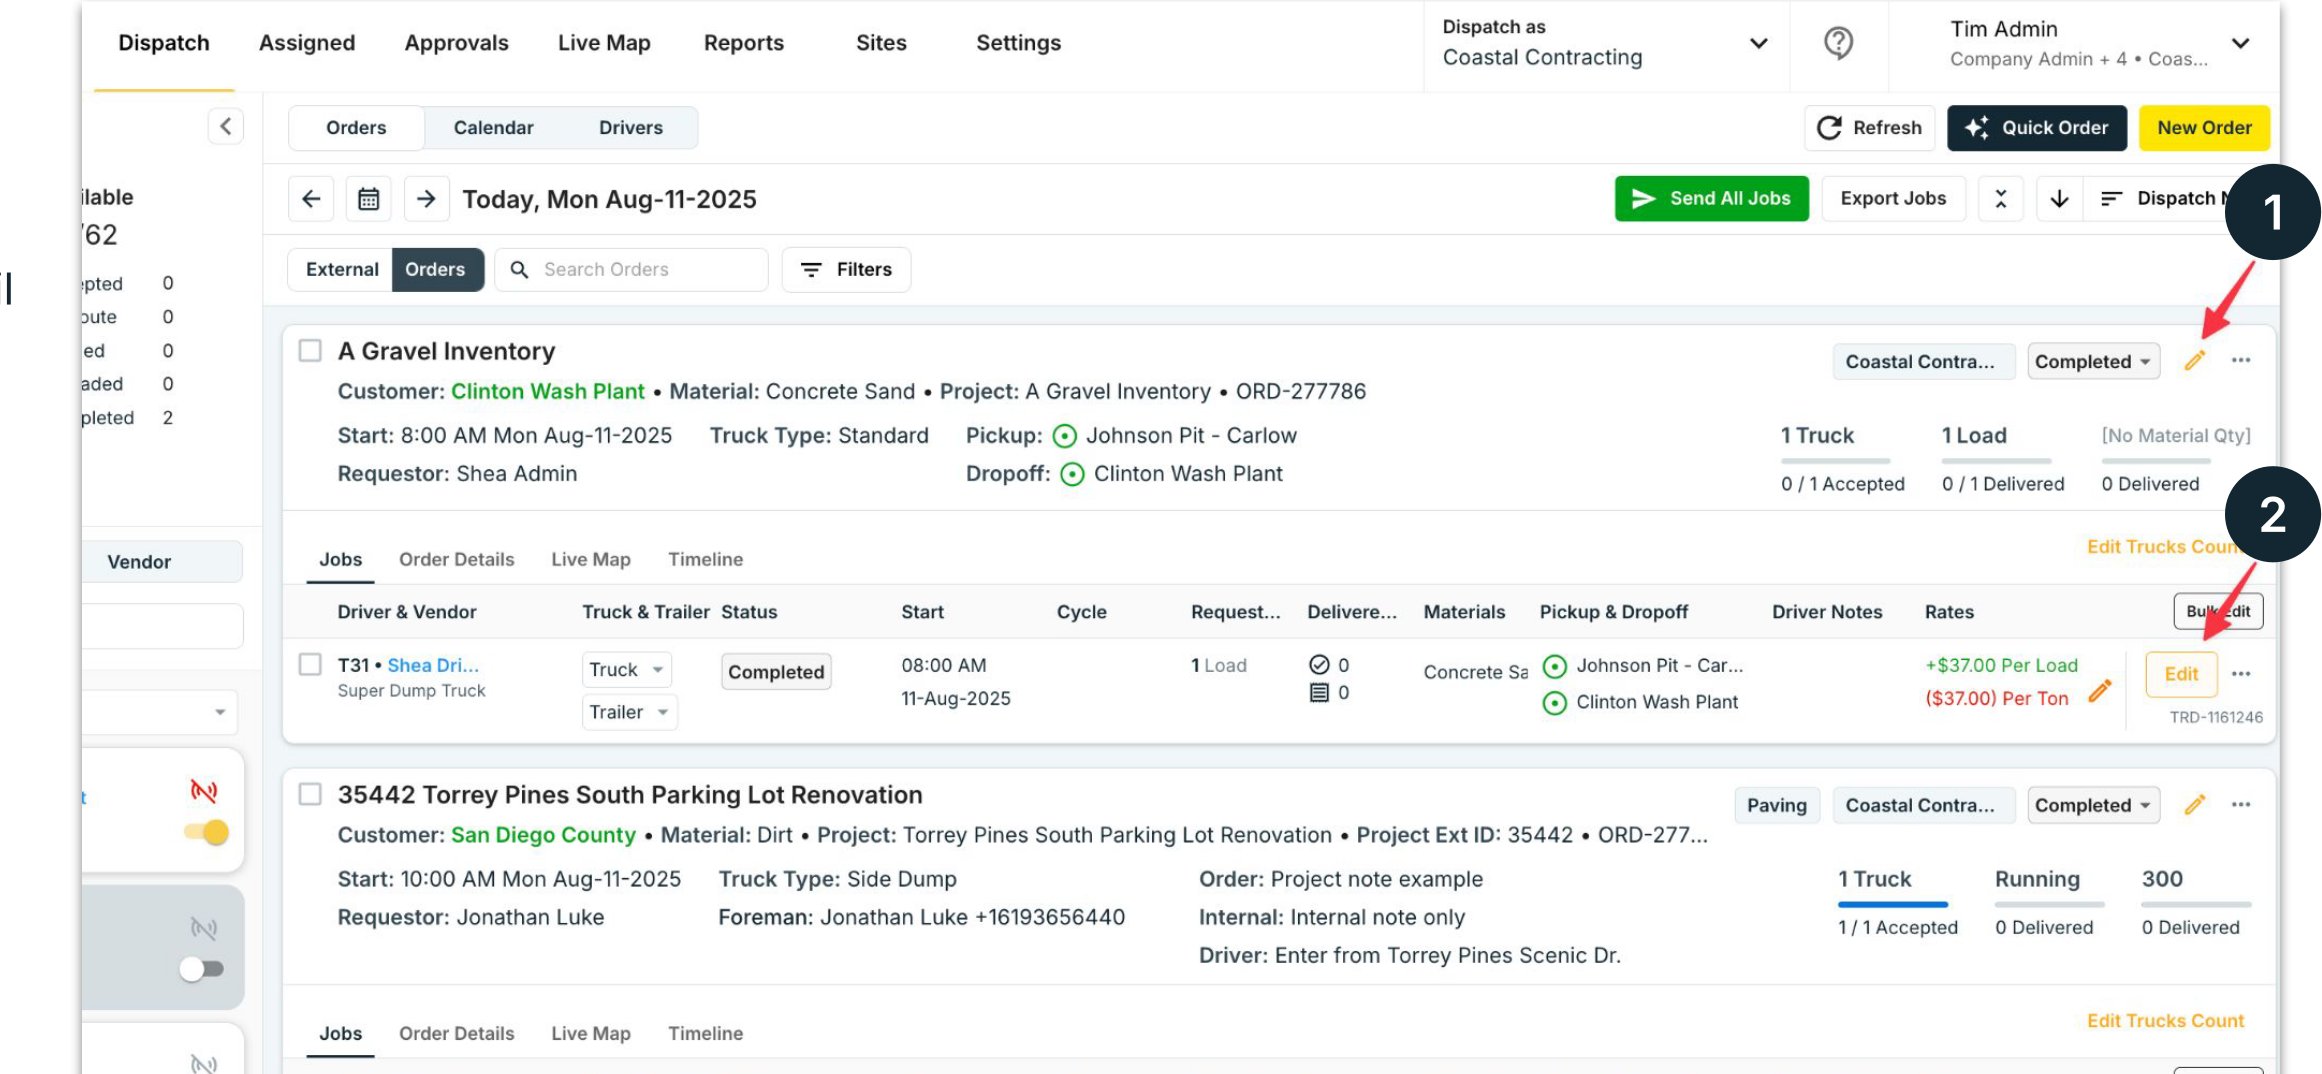 Each job moves along this status flow as the day runs:
**Accepted → To Pickup → At Pickup → Loaded → To Dropoff → At Dropoff → Unloaded → In Review → Completed**
## Assign to your own driver — or a vendor
When you assign a job, you choose **who hauls it**. In the **Assign** panel you toggle between **Driver** and **Vendor**. Pick the wrong one and the driver never sees the load, or the wrong company gets billed, so confirm the relationship first. Full detail in [Dispatching to Drivers and Vendors](/concepts/dispatching-drivers-vendors).
| Assign to | Who hauls it | In the Assign panel | When to use |
| ------------------- | ------------------------------------- | ------------------- | ----------------------------------------------------------------------------- |
| **Internal Driver** | Your own driver | **Driver** tab | Your own drivers and trucks |
| **Shared Driver** | A driver a partner shares to you | **Driver** tab | A partner (often an Owner-Operator) whose specific driver you assign yourself |
| **Vendor** | A hauling company that sub-dispatches | **Vendor** tab | You hired a hauling company; their dispatcher picks the driver |
**Vendor** dispatch needs an accepted Vendor connection, and a **Shared Driver** must be shared to you — otherwise the job won't send or the driver won't appear in your Assign list. Check **Settings → Vendors** and **Settings → Drivers** first.
## Before you dispatch — checklist
A project and at least one order for the day. See [Create a Project, Order & Dispatch](/workflows/create-a-project).
Drivers added (and invited so they have the app), trucks created, default trucks paired to drivers. See [Set Up Trucks & Drivers](/vendor-guide/setup-trucks-and-drivers).
For a Vendor, the connection is accepted. For a Shared Driver, the partner has shared the driver to you.
## Next
* [Dispatch a Job (Web & Mobile)](/dispatch-guide/dispatch-a-job) — the step-by-step assign → send → monitor flow, and what your driver sees
* [Dispatching to Drivers and Vendors](/concepts/dispatching-drivers-vendors) — internal, shared, and vendor drivers, in depth
* [Track Drivers & Collect Tickets](/workflows/track-drivers-collect-tickets) — what happens after the load is sent
* [Tread Dispatch Guide (single-page version)](https://tread.ai/dispatchguide/) — this guide as one shareable HTML page
Each job moves along this status flow as the day runs:
**Accepted → To Pickup → At Pickup → Loaded → To Dropoff → At Dropoff → Unloaded → In Review → Completed**
## Assign to your own driver — or a vendor
When you assign a job, you choose **who hauls it**. In the **Assign** panel you toggle between **Driver** and **Vendor**. Pick the wrong one and the driver never sees the load, or the wrong company gets billed, so confirm the relationship first. Full detail in [Dispatching to Drivers and Vendors](/concepts/dispatching-drivers-vendors).
| Assign to | Who hauls it | In the Assign panel | When to use |
| ------------------- | ------------------------------------- | ------------------- | ----------------------------------------------------------------------------- |
| **Internal Driver** | Your own driver | **Driver** tab | Your own drivers and trucks |
| **Shared Driver** | A driver a partner shares to you | **Driver** tab | A partner (often an Owner-Operator) whose specific driver you assign yourself |
| **Vendor** | A hauling company that sub-dispatches | **Vendor** tab | You hired a hauling company; their dispatcher picks the driver |
**Vendor** dispatch needs an accepted Vendor connection, and a **Shared Driver** must be shared to you — otherwise the job won't send or the driver won't appear in your Assign list. Check **Settings → Vendors** and **Settings → Drivers** first.
## Before you dispatch — checklist
A project and at least one order for the day. See [Create a Project, Order & Dispatch](/workflows/create-a-project).
Drivers added (and invited so they have the app), trucks created, default trucks paired to drivers. See [Set Up Trucks & Drivers](/vendor-guide/setup-trucks-and-drivers).
For a Vendor, the connection is accepted. For a Shared Driver, the partner has shared the driver to you.
## Next
* [Dispatch a Job (Web & Mobile)](/dispatch-guide/dispatch-a-job) — the step-by-step assign → send → monitor flow, and what your driver sees
* [Dispatching to Drivers and Vendors](/concepts/dispatching-drivers-vendors) — internal, shared, and vendor drivers, in depth
* [Track Drivers & Collect Tickets](/workflows/track-drivers-collect-tickets) — what happens after the load is sent
* [Tread Dispatch Guide (single-page version)](https://tread.ai/dispatchguide/) — this guide as one shareable HTML page