> ## Documentation Index
> Fetch the complete documentation index at: https://docs.tread.ai/llms.txt
> Use this file to discover all available pages before exploring further.
# Redo a Approved Settlement
# Fix a Settlement (Void & Change)
**Purpose:** Void an settlement, correct or add missing details (such as a fuel surcharge or a rate fix), and create a new settlement to send to the customer or vendor.
**When to run:** Any time line items on a settlement is found to be incorrect or incomplete. Approved settlements cannot be edited directly — they must be voided and recreated.
**Prerequisites:** The settlement you need to fix has been created. You know what needs to change (an add-on for a single invoice, or an order-level change that should apply across all loads).
**Related:** Create & Send Settlements — the happy-path settlement workflow this is the recovery flow for.
***
## Section 1: Void the existing settlement
### Step 1 — Open the approved settlement
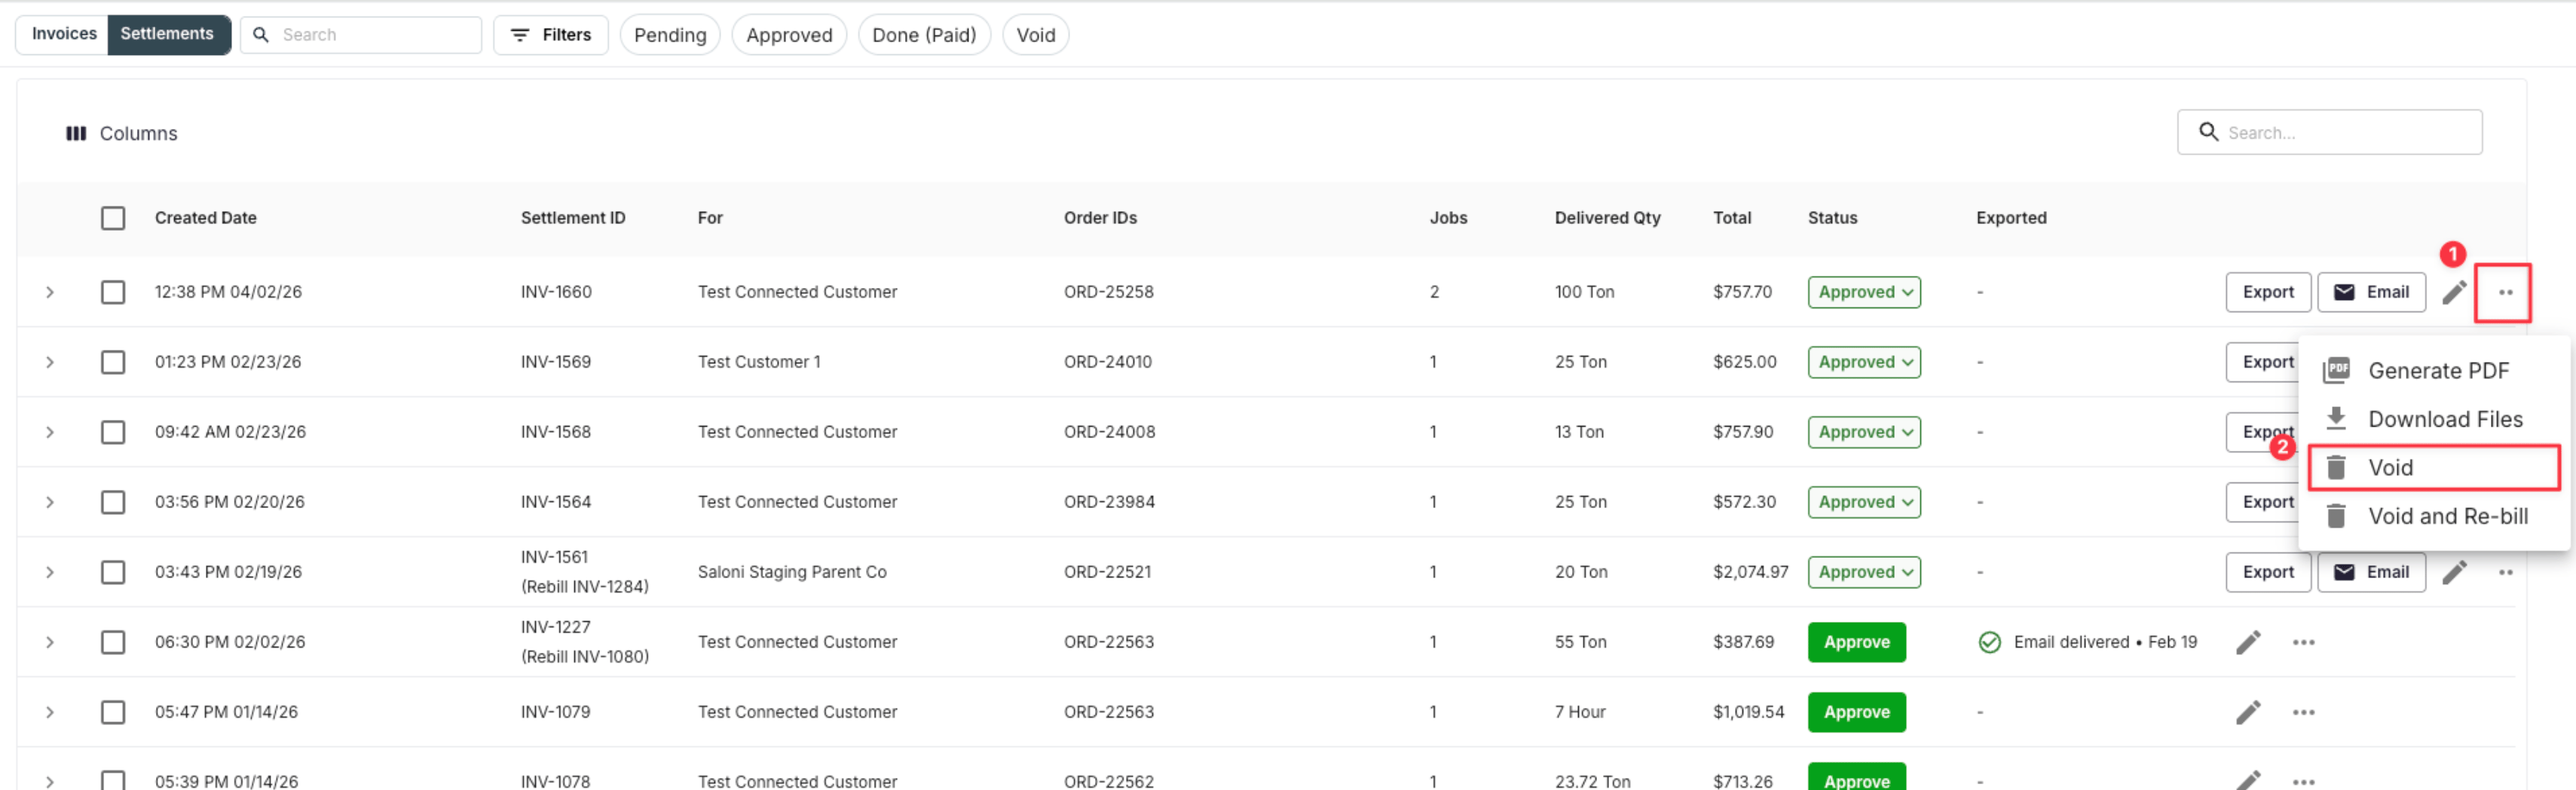
Go to the **Settlements** tab and locate the approved settlement you need to modify.
### Step 2 — Void it
Click **Void** on the settlement. This removes the settlement but preserves the underlying order, so you can create a new settlement with updated information.
 ***
## Section 2: Unapprove the receivables or payables
### Step 3 — Navigate to Receivables (or Payables)
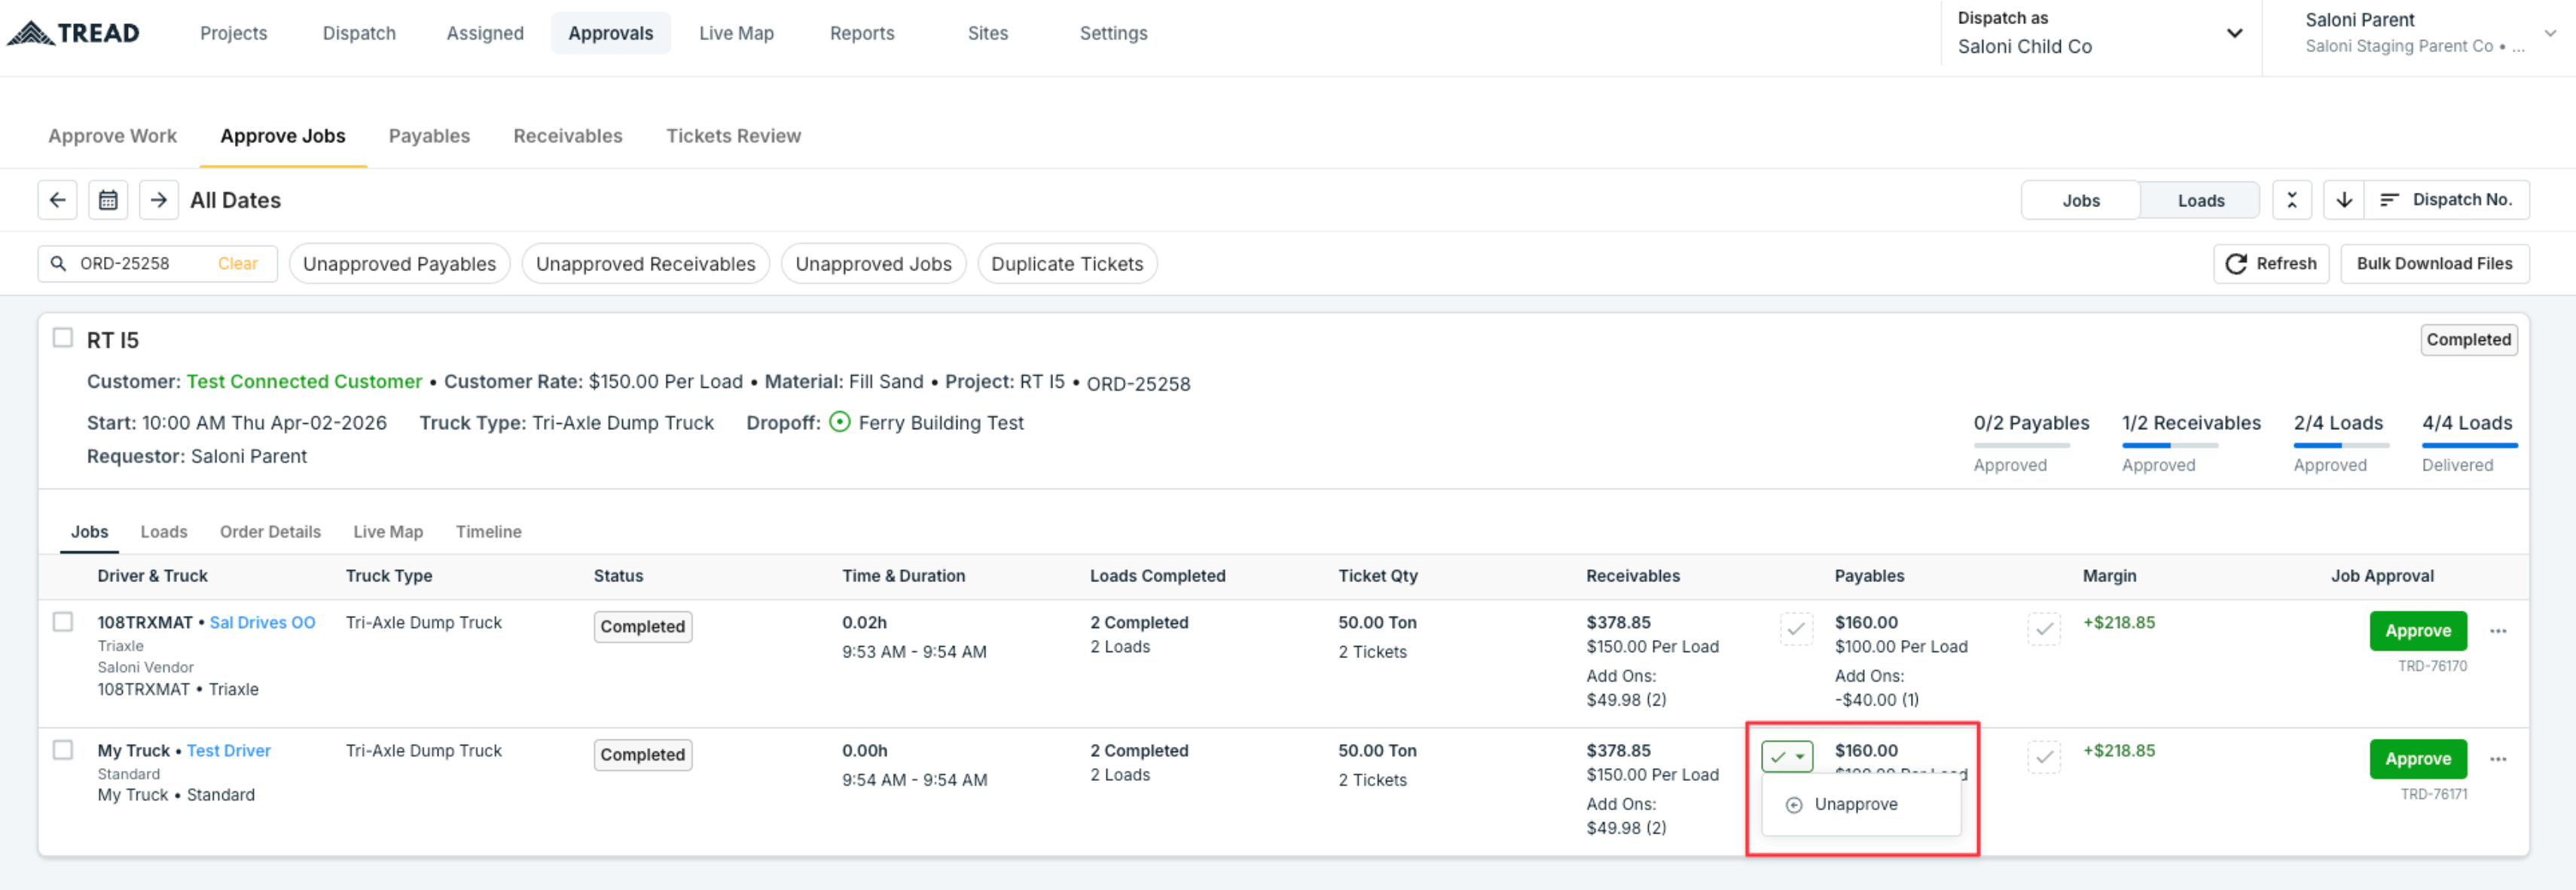
Navigate back to the **Payables** or **Receivables** tab that you would like to make changes to.
### Step 4 — Unapprove the invoice
Click **Unapprove** under the invoice. The line items have to be unapproved before you can edit them.
***
## Section 2: Unapprove the receivables or payables
### Step 3 — Navigate to Receivables (or Payables)
Navigate back to the **Payables** or **Receivables** tab that you would like to make changes to.
### Step 4 — Unapprove the invoice
Click **Unapprove** under the invoice. The line items have to be unapproved before you can edit them.
 ***
## Section 3: Make your changes
**Pick the option that matches the scope of the change:**
* **One individual change on one job/dispatch?** Use Option A.
* **A charge or rate change that should apply across the whole order?** Use Option B.
### Option A — Edit at the individual job/dispatch level
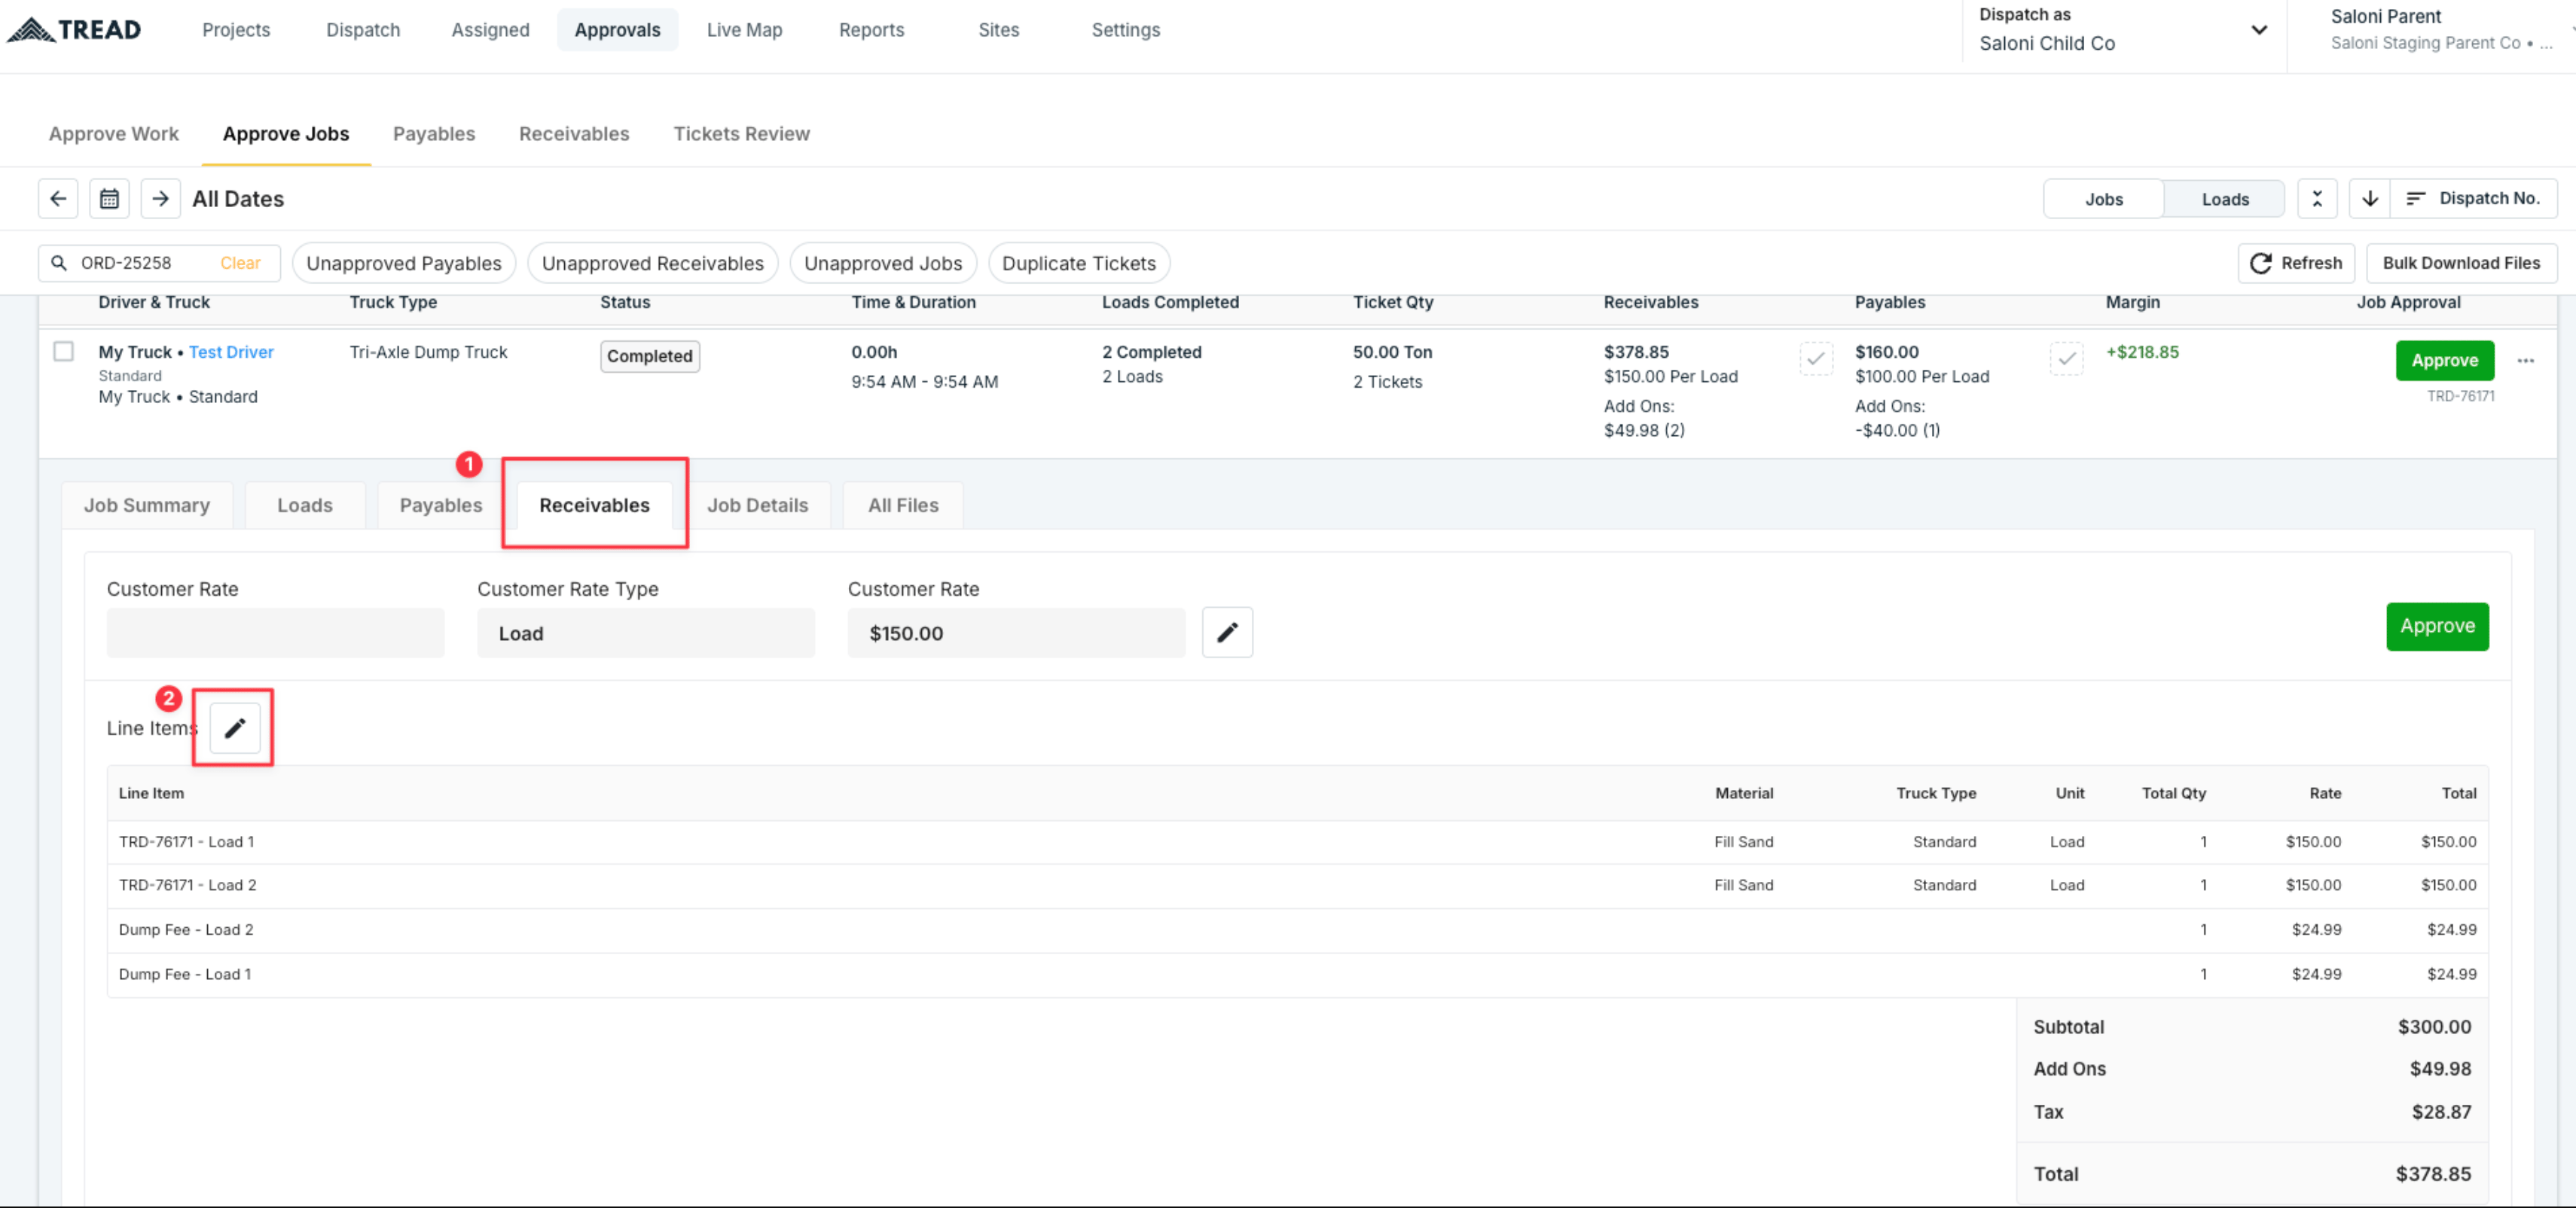
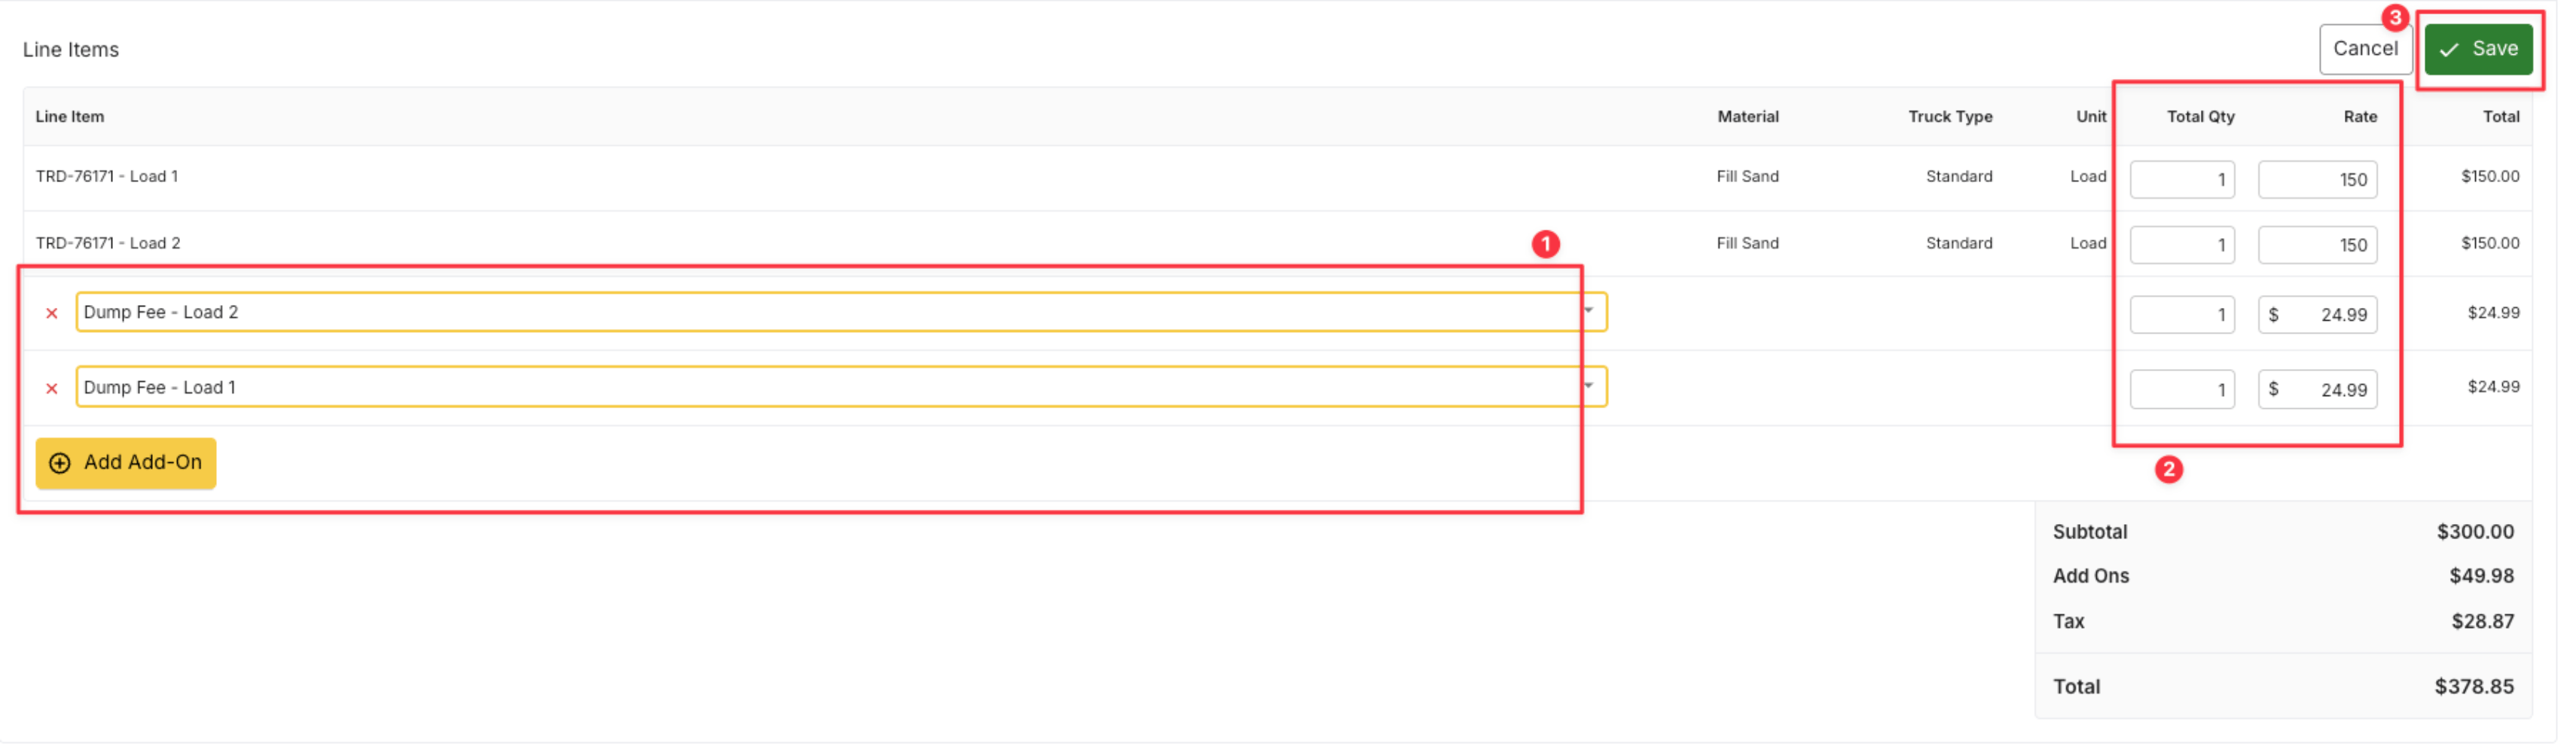
For a one-time change on a specific invoice (e.g., a single Job-level change), edit directly in the receivables/payables view without leaving the screen.
1. Locate the line item you want to modify.
2. Click on the **pencil** icon to edit rates, quantities or add-ons.
3. Save your changes.
***
## Section 3: Make your changes
**Pick the option that matches the scope of the change:**
* **One individual change on one job/dispatch?** Use Option A.
* **A charge or rate change that should apply across the whole order?** Use Option B.
### Option A — Edit at the individual job/dispatch level
For a one-time change on a specific invoice (e.g., a single Job-level change), edit directly in the receivables/payables view without leaving the screen.
1. Locate the line item you want to modify.
2. Click on the **pencil** icon to edit rates, quantities or add-ons.
3. Save your changes.
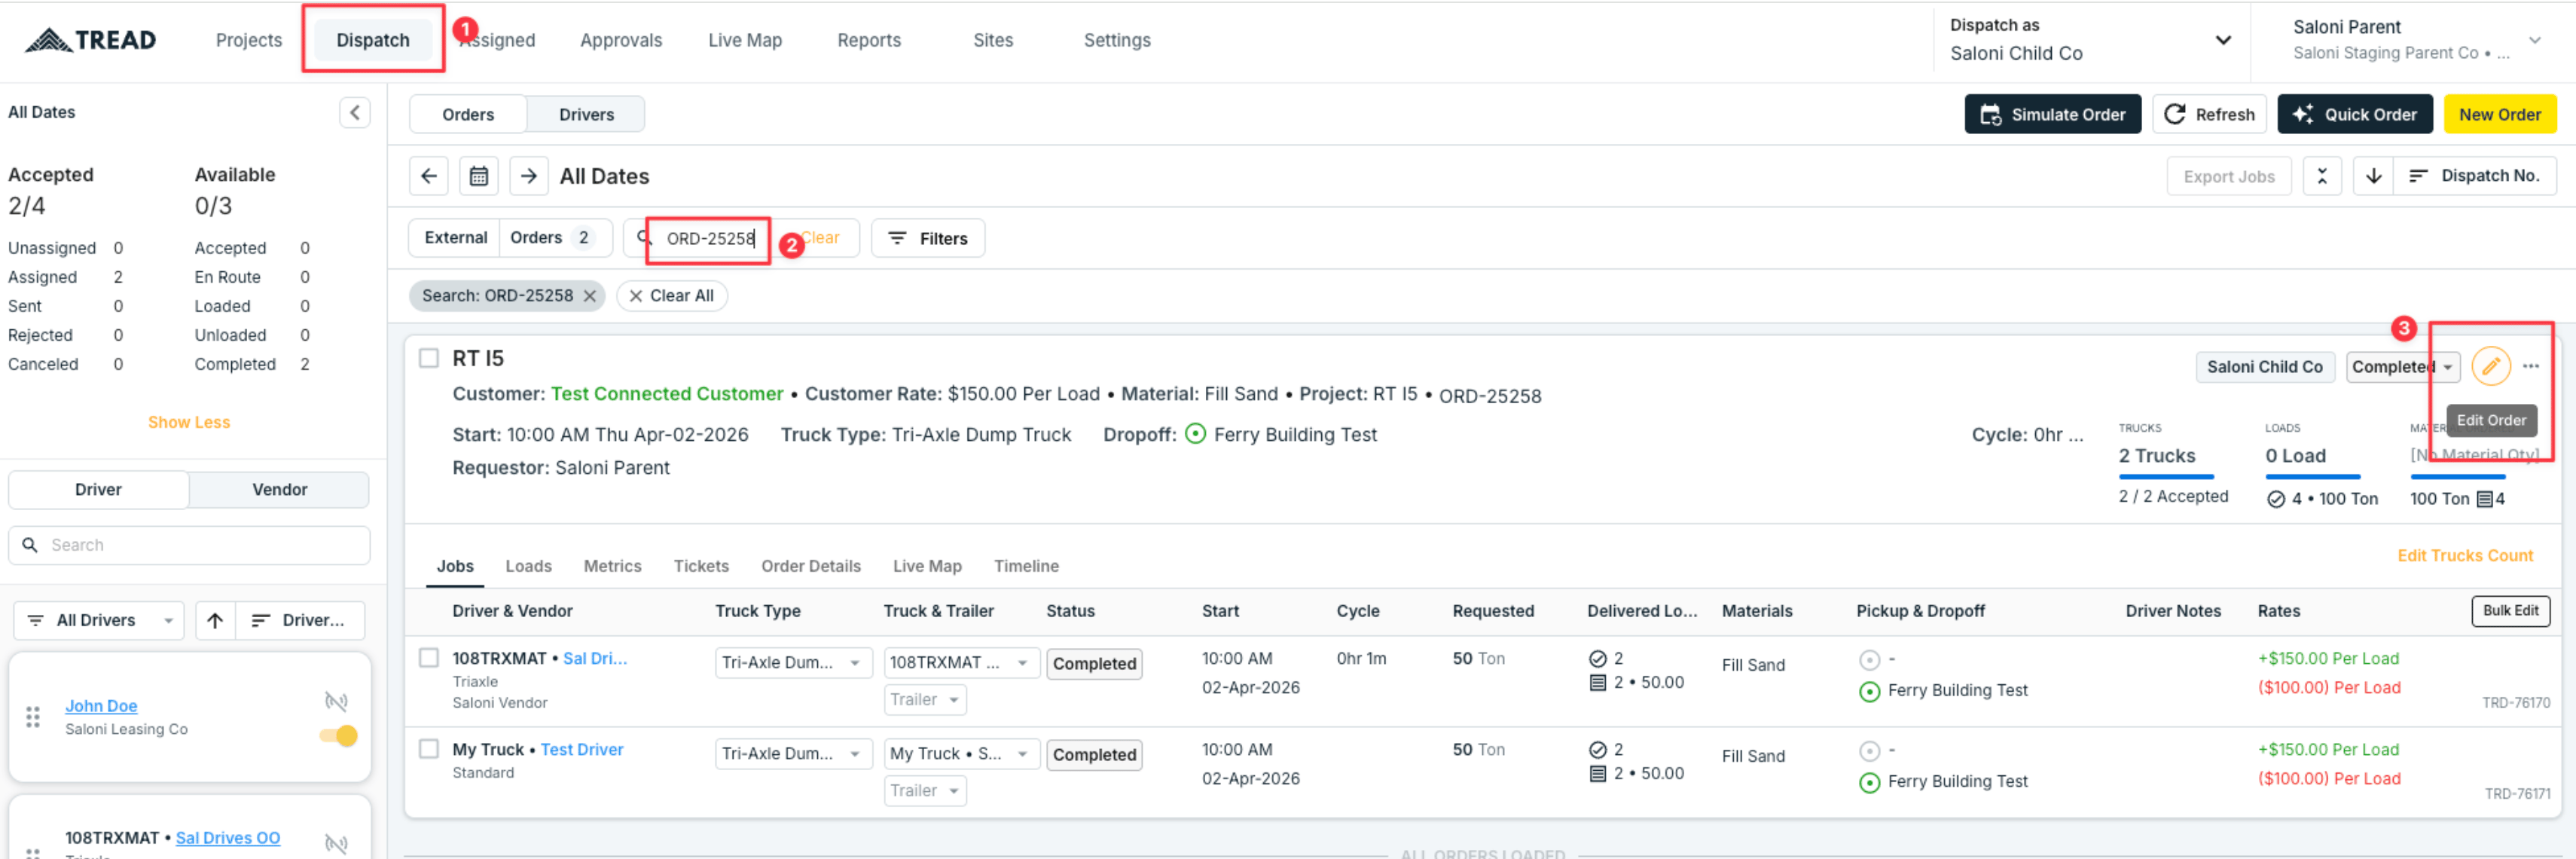
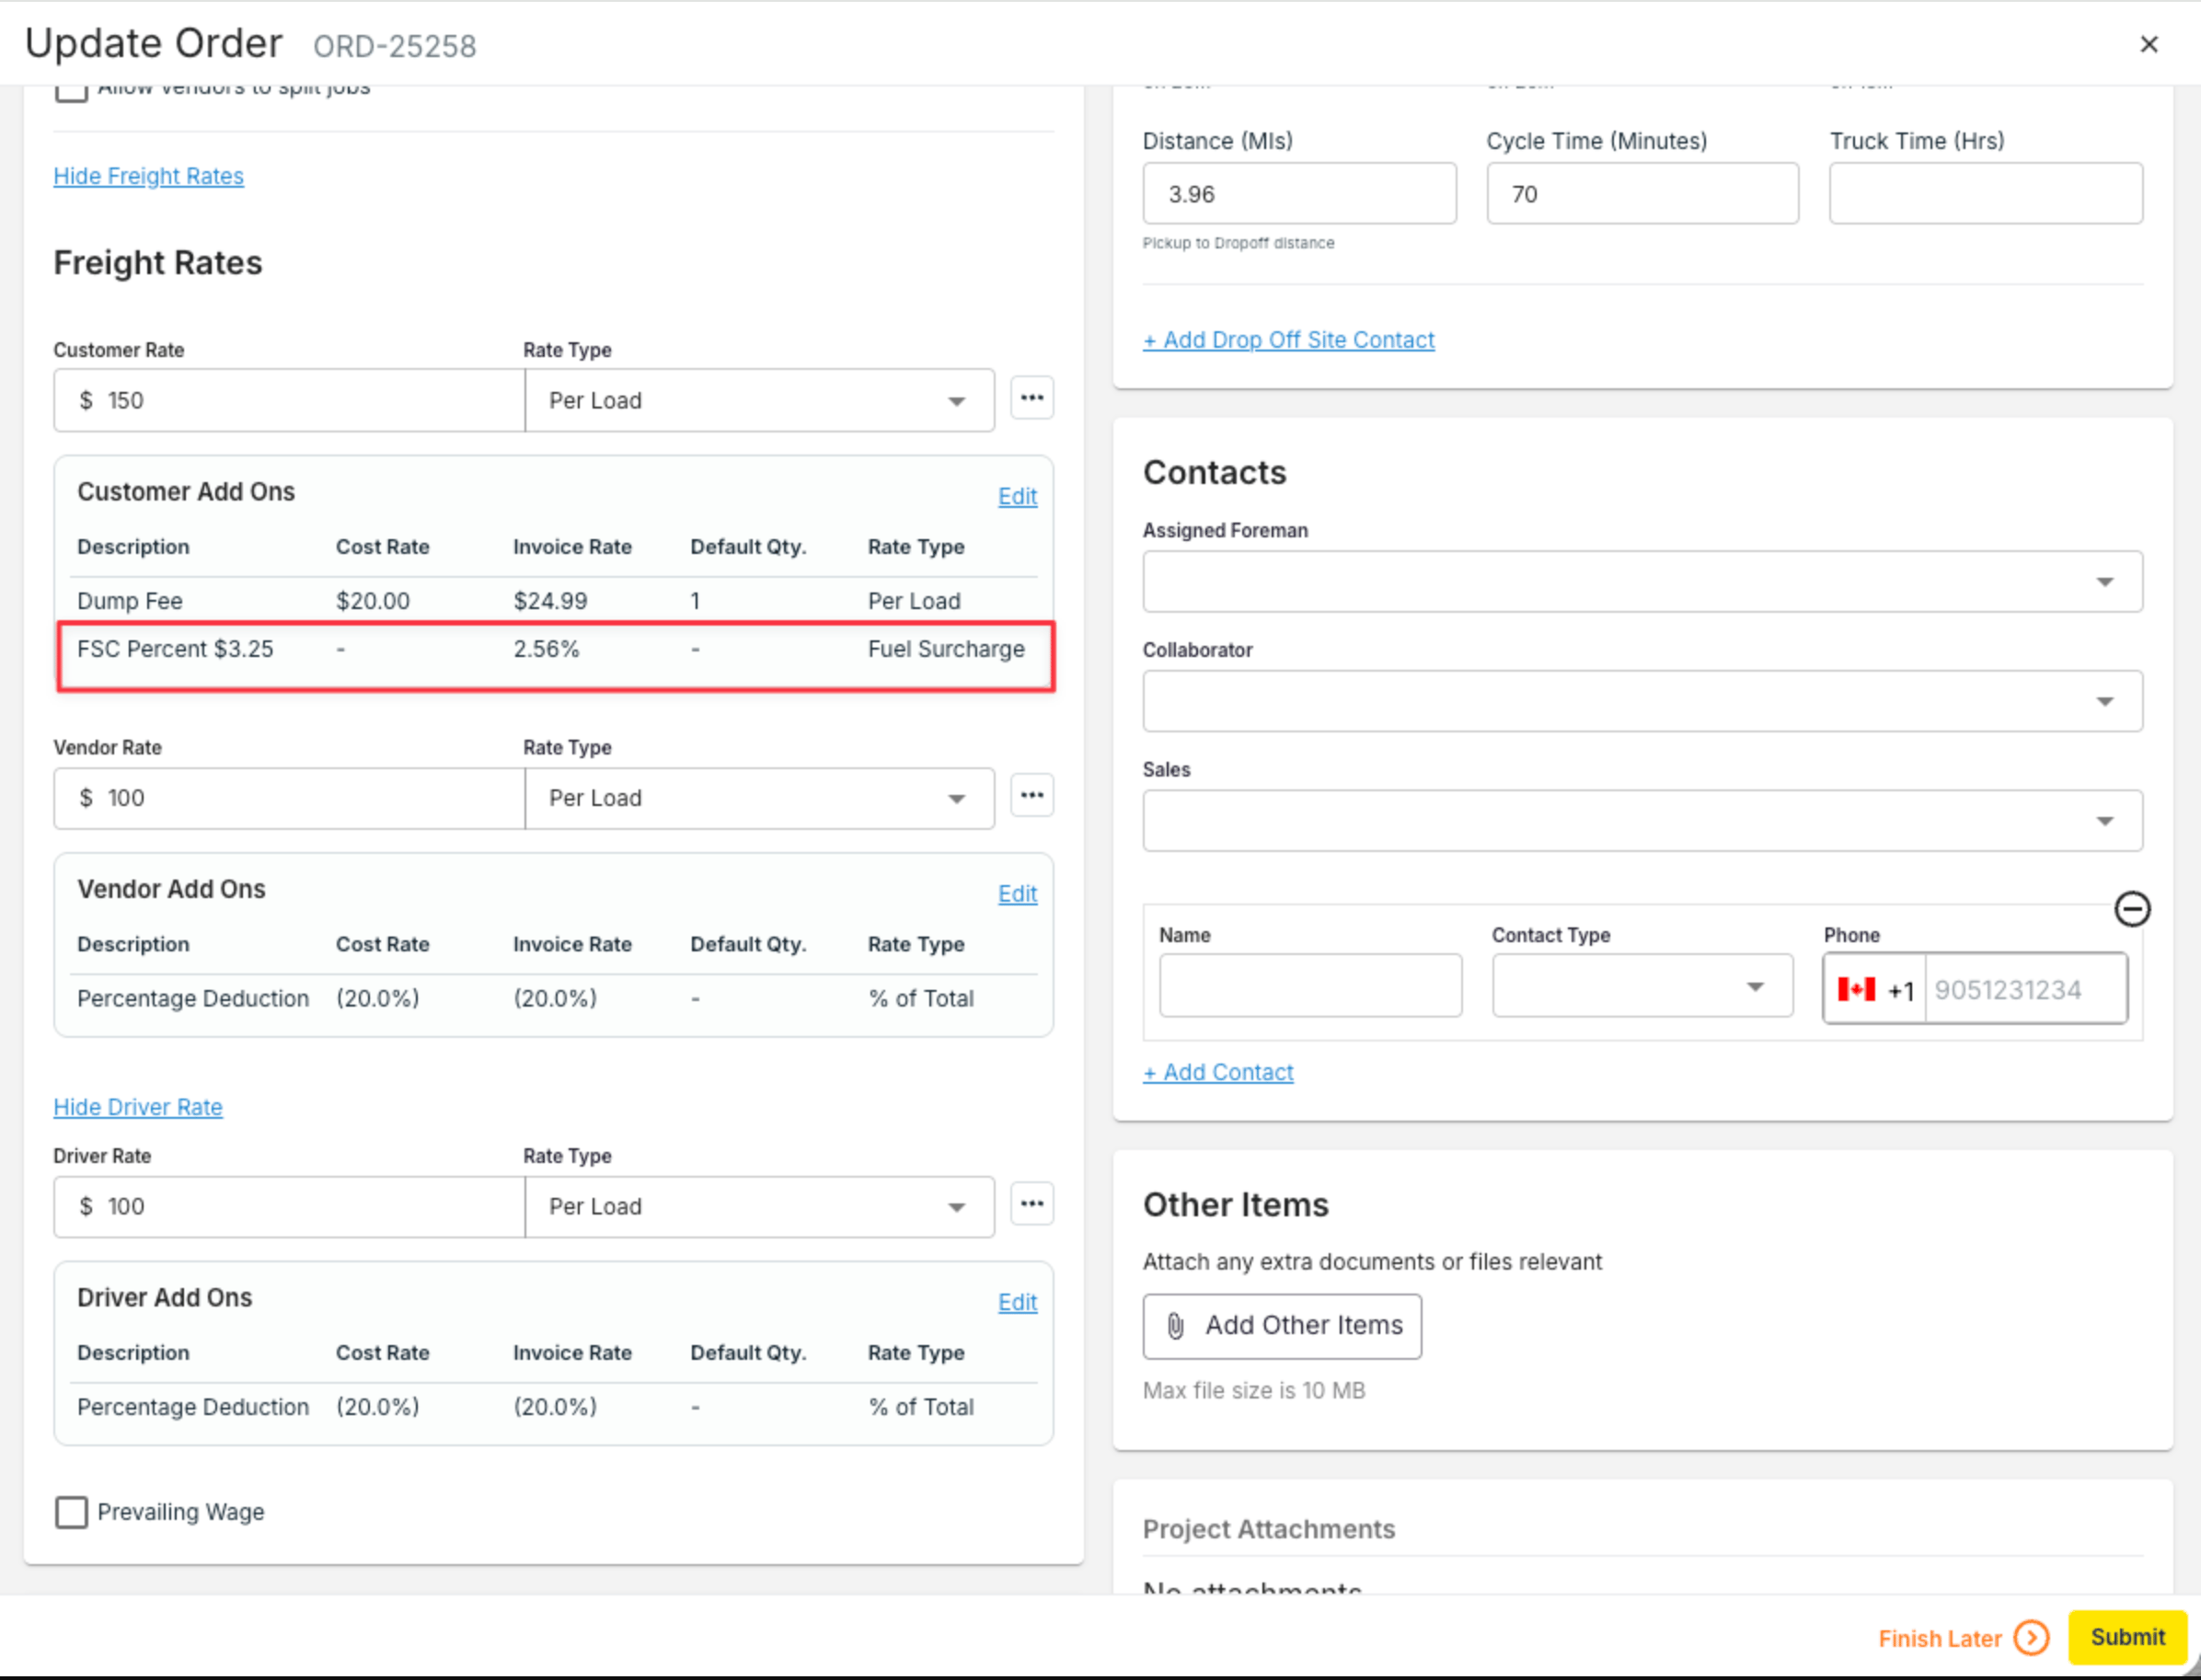
 ### Option B — Edit at the order level
For changes that apply to the entire order — such as a fuel surcharge, a rate correction, or any charge that should appear across all loads — make the change in Dispatch.
1. Copy the order number from the receivables/payables view.
2. Navigate to the **Dispatch** tab.
3. Locate and open the order.
4. Add the missing item (e.g., fuel surcharge) in the appropriate field.
5. Click **Save**, then **Submit**.
6. The change automatically applies to all invoices under that order.
### Option B — Edit at the order level
For changes that apply to the entire order — such as a fuel surcharge, a rate correction, or any charge that should appear across all loads — make the change in Dispatch.
1. Copy the order number from the receivables/payables view.
2. Navigate to the **Dispatch** tab.
3. Locate and open the order.
4. Add the missing item (e.g., fuel surcharge) in the appropriate field.
5. Click **Save**, then **Submit**.
6. The change automatically applies to all invoices under that order.
 ### Step 5 — Verify changes applied
Return to the Receivables (or Payables) tab and confirm the changes are reflected. For example, if you added a fuel surcharge at the order level, you should now see it on all relevant loads/trucks under that order.
***
## Section 4: Re-approve and create a new settlement
### Step 6 — Approve the updated receivables/payables
With your changes in place, re-approve each invoice. This is the same approval step from the original workflow. You can bulk approve directly in the Payables or Receivables tabs.
### Step 7 — Create the new settlement
Click **Create Settlement** on the order in the Receivables/Payables view. Manual selection (vs. bulk) is the right call here since you're typically redoing one settlement, not processing many at once.
The system generates a new settlement for that order, now including your changes.
### Step 5 — Verify changes applied
Return to the Receivables (or Payables) tab and confirm the changes are reflected. For example, if you added a fuel surcharge at the order level, you should now see it on all relevant loads/trucks under that order.
***
## Section 4: Re-approve and create a new settlement
### Step 6 — Approve the updated receivables/payables
With your changes in place, re-approve each invoice. This is the same approval step from the original workflow. You can bulk approve directly in the Payables or Receivables tabs.
### Step 7 — Create the new settlement
Click **Create Settlement** on the order in the Receivables/Payables view. Manual selection (vs. bulk) is the right call here since you're typically redoing one settlement, not processing many at once.
The system generates a new settlement for that order, now including your changes.
 ### Step 8 — Review the new settlement
Open the **Settlements** tab and the newly created settlement. Scroll down to verify all changes are present — for example, confirm the fuel surcharge appears for every applicable truck.
***
## Section 5: Approve and email the new settlement
### Step 9 — Approve
Click **Approve** on the new settlement.
### Step 10 — Email
Click **Email** to send the updated invoice to the customer or vendor, then click **Send** to confirm. Verify delivery in the status indicator.
***
## Tips
1. **Access voided settlements for reference.** If you need to look up a previous voided settlement (for record-keeping or comparison), go to the **Settlements** tab and click the **Void** filter. This displays all previously voided settlements.
2. **Choose Option A vs Option B by blast radius.** If only one invoice is affected, Option A (invoice-level add-on) is faster and lower-risk. If the change should apply to every load on the order, always use Option B (order/dispatch level) — applying it invoice-by-invoice is where mistakes happen.
***
## Done when
The corrected settlement has been approved, emailed, and confirmed delivered. The original (incorrect) settlement remains accessible under the Void filter for reference.
### Step 8 — Review the new settlement
Open the **Settlements** tab and the newly created settlement. Scroll down to verify all changes are present — for example, confirm the fuel surcharge appears for every applicable truck.
***
## Section 5: Approve and email the new settlement
### Step 9 — Approve
Click **Approve** on the new settlement.
### Step 10 — Email
Click **Email** to send the updated invoice to the customer or vendor, then click **Send** to confirm. Verify delivery in the status indicator.
***
## Tips
1. **Access voided settlements for reference.** If you need to look up a previous voided settlement (for record-keeping or comparison), go to the **Settlements** tab and click the **Void** filter. This displays all previously voided settlements.
2. **Choose Option A vs Option B by blast radius.** If only one invoice is affected, Option A (invoice-level add-on) is faster and lower-risk. If the change should apply to every load on the order, always use Option B (order/dispatch level) — applying it invoice-by-invoice is where mistakes happen.
***
## Done when
The corrected settlement has been approved, emailed, and confirmed delivered. The original (incorrect) settlement remains accessible under the Void filter for reference.