> ## Documentation Index
> Fetch the complete documentation index at: https://docs.tread.ai/llms.txt
> Use this file to discover all available pages before exploring further.
# Create a Project - Detailed Guide
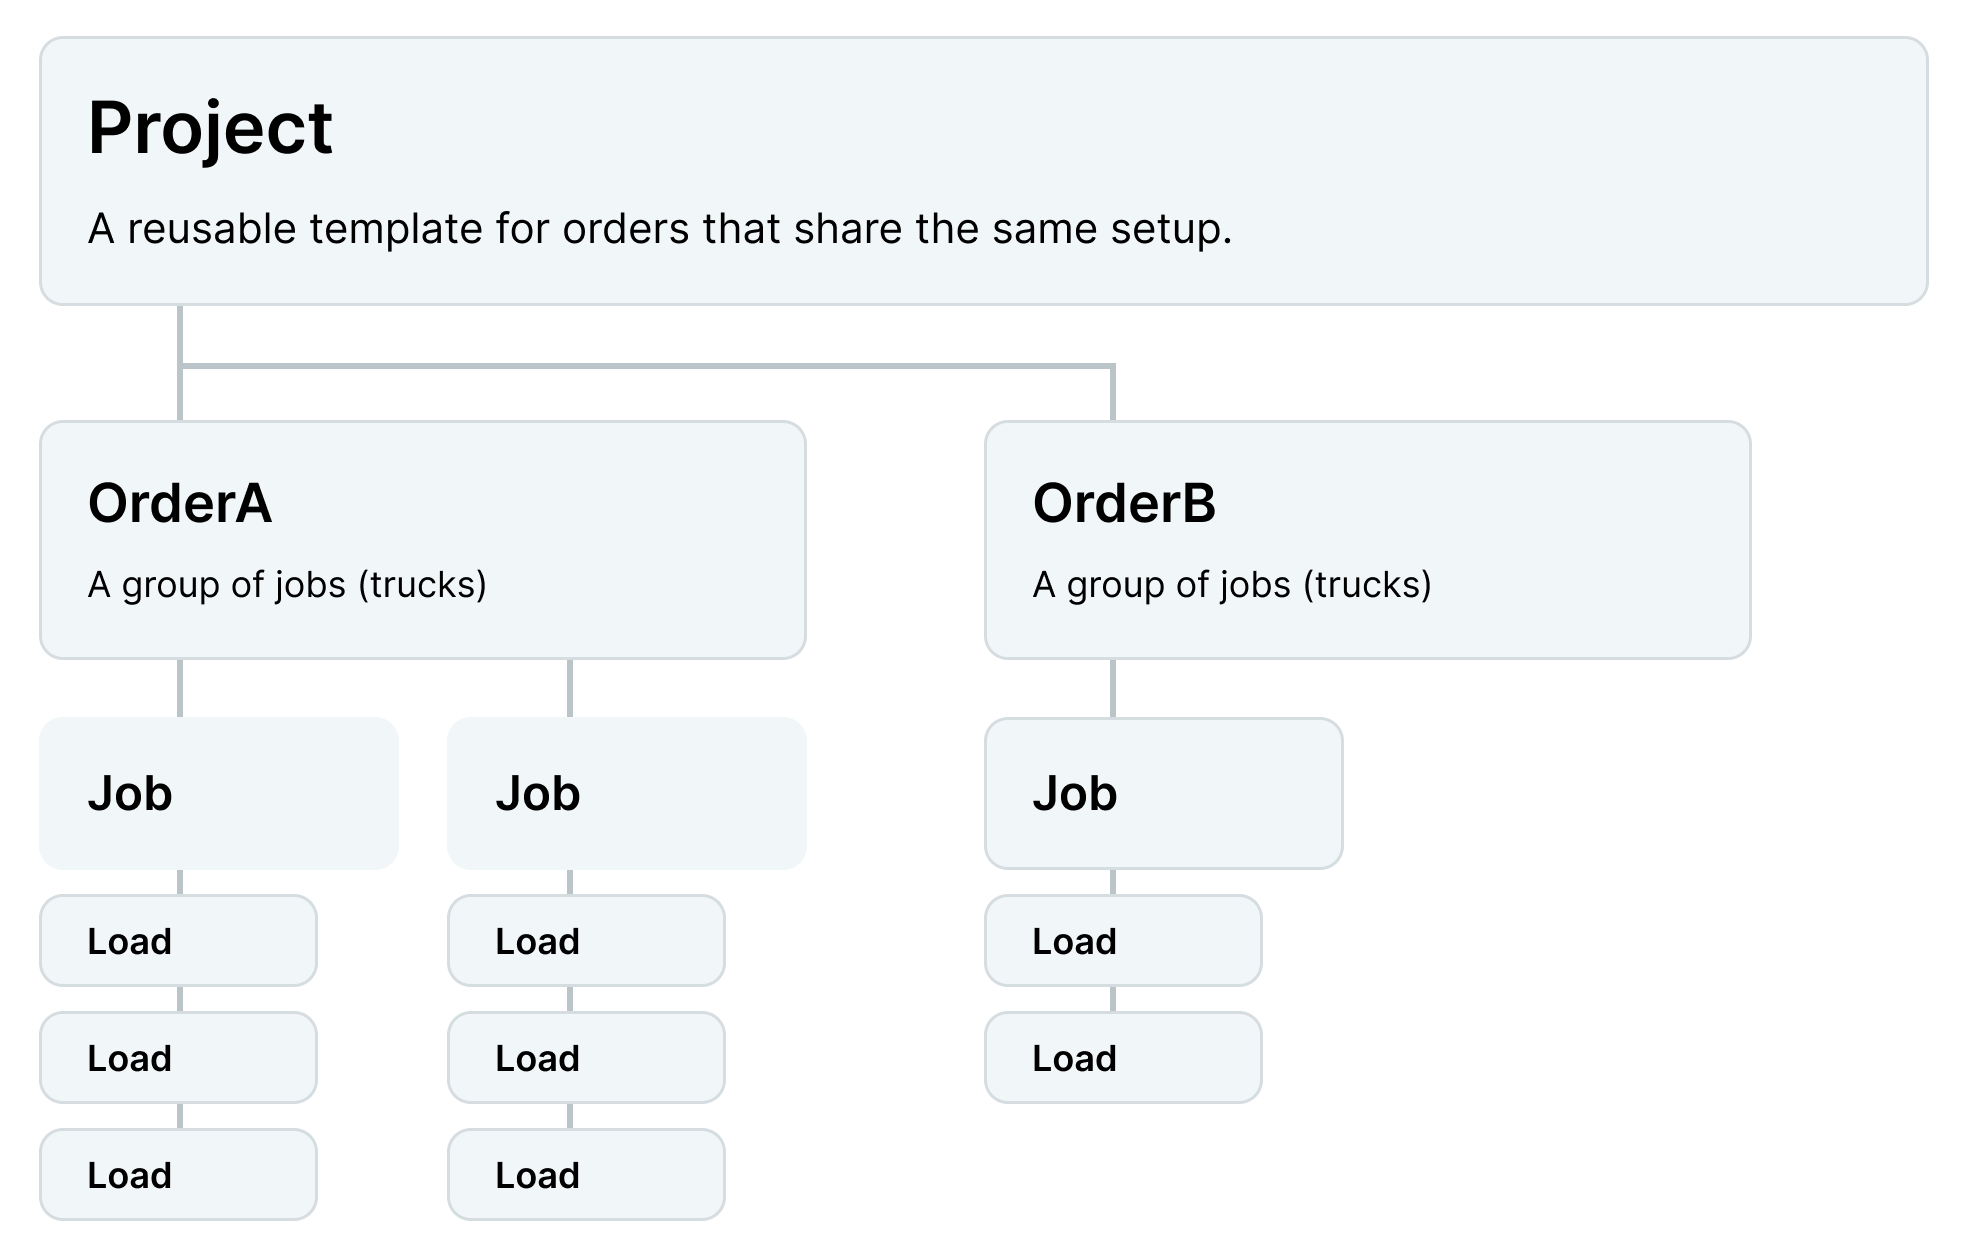
Projects are created to represent a specific scope of work for your clients to allow for proper reporting, billing, and to create orders in Tread.
Projects in Tread work like templates. Setting up your project information upfront means that details flow down automatically to each order, so you don't have to re-enter them every day.
 ***
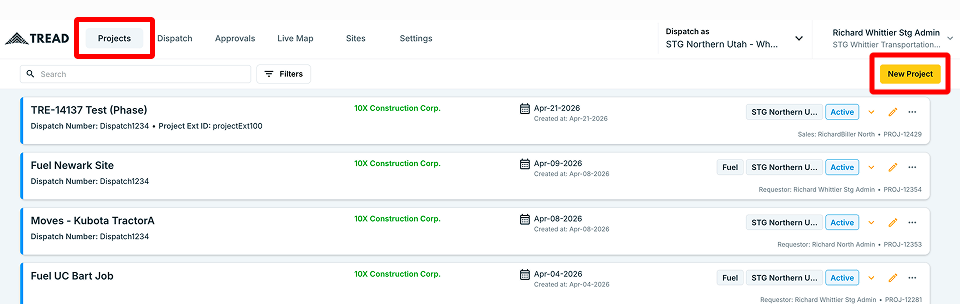
To get started, navigate to the **Projects** tab in the top left corner of your screen, then click **New Project**.
***
To get started, navigate to the **Projects** tab in the top left corner of your screen, then click **New Project**.
 ***
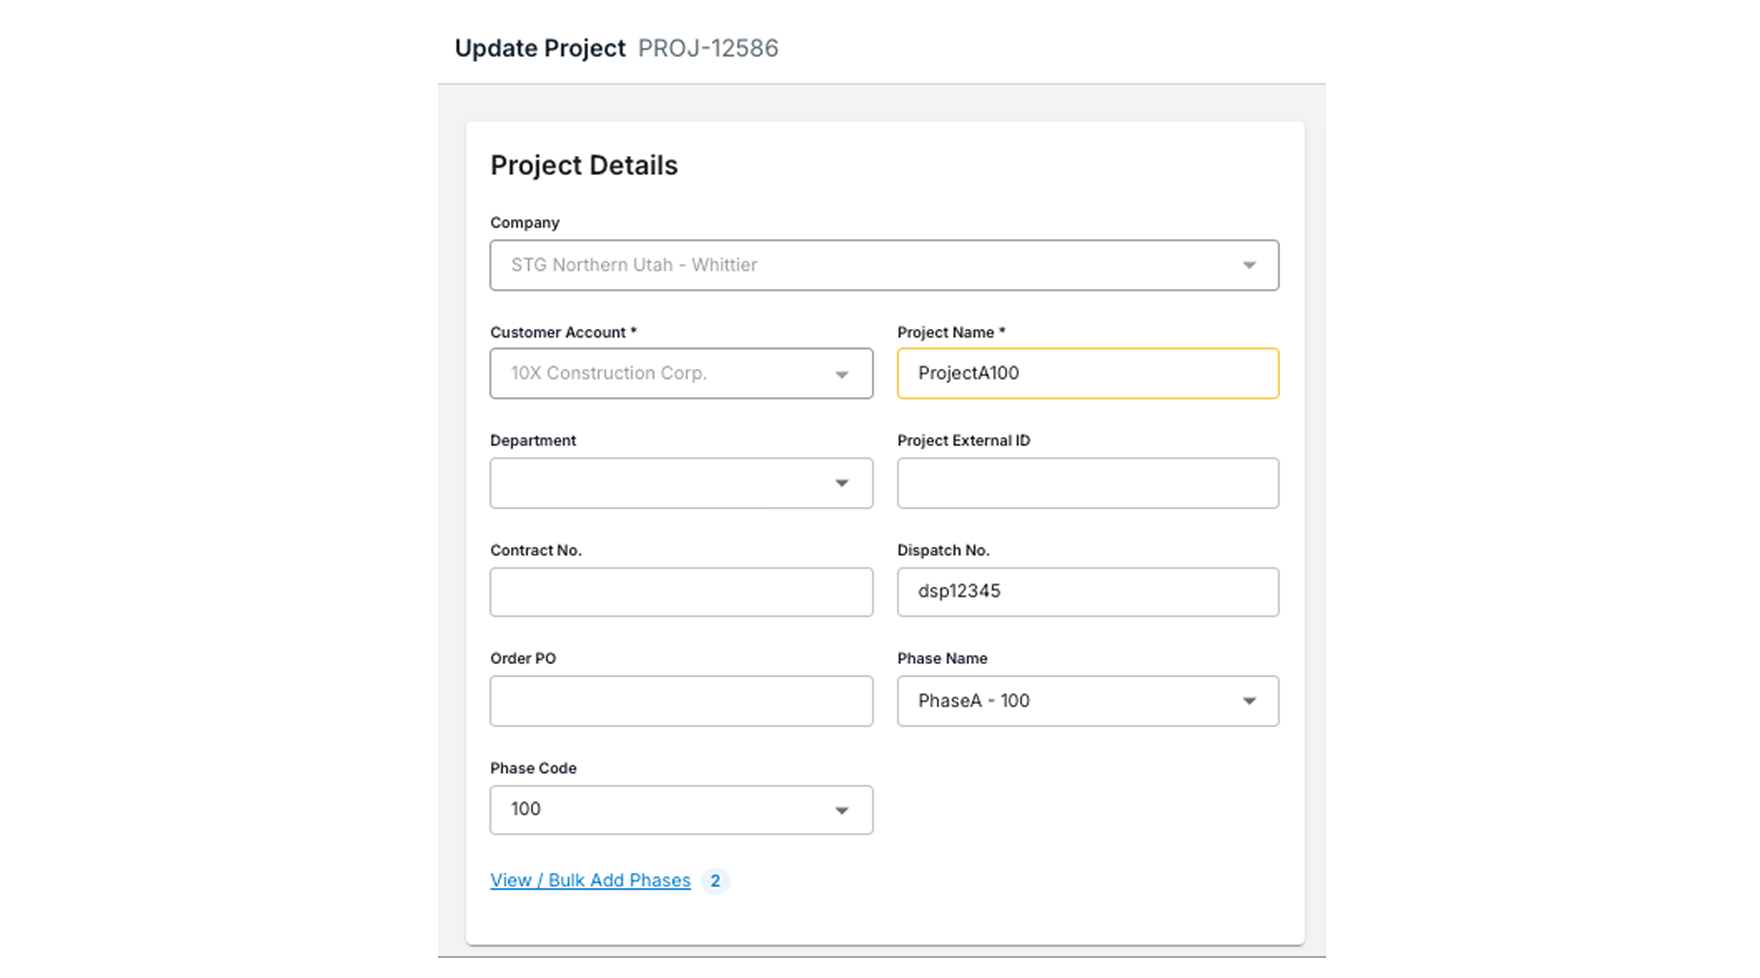
### **Step 1: Project Details**
Fill in the following fields to set up the basics of your project:
* **Customer** — Select an existing customer account or create a new one directly from this screen.
* **Project Name** — Give your project a clear name (e.g. Taylor Stadium).
* **Department** — Assign a department if applicable (e.g., Hauling).
* **Project External ID** — Optional reference ID for your own tracking (e.g. a Job ID from an external system)
* **Dispatch Number / Order PO** — Add these if required for your workflow.
**Project External ID**
***
### **Step 1: Project Details**
Fill in the following fields to set up the basics of your project:
* **Customer** — Select an existing customer account or create a new one directly from this screen.
* **Project Name** — Give your project a clear name (e.g. Taylor Stadium).
* **Department** — Assign a department if applicable (e.g., Hauling).
* **Project External ID** — Optional reference ID for your own tracking (e.g. a Job ID from an external system)
* **Dispatch Number / Order PO** — Add these if required for your workflow.
**Project External ID**
This is a unique value which cannot be shared across projects.
It can be used to "link" projects together.
 #### **Phase Codes**
If your project has phases:
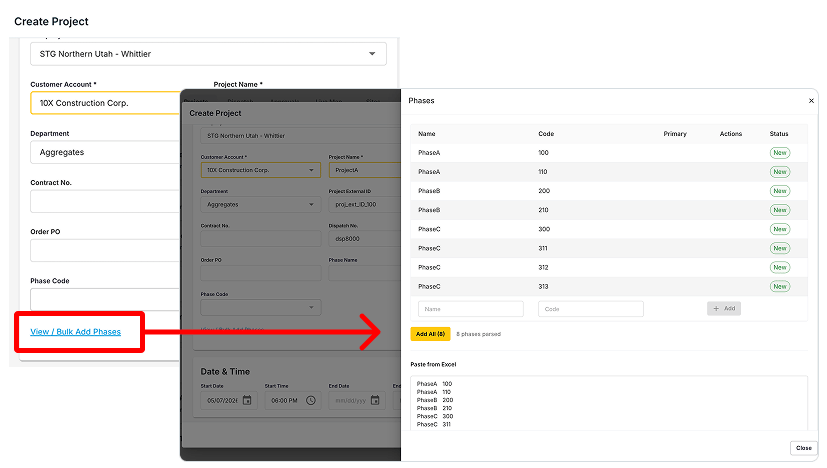
* Click "View / Bulk Add Phases" to enter phase codes
* You can enter them one by one, or copy and paste from a spreadsheet
#### **Phase Codes**
If your project has phases:
* Click "View / Bulk Add Phases" to enter phase codes
* You can enter them one by one, or copy and paste from a spreadsheet
 ***
### **Step 2: Dates**
Set a **Start Date** and **Start Time** for the project. If you don't yet know the end date, you can leave that field blank and fill it in later.
***
### **Step 2: Dates**
Set a **Start Date** and **Start Time** for the project. If you don't yet know the end date, you can leave that field blank and fill it in later.
 ***
### **Step 3: Pickup and Drop-Off Sites**
If you know your pickup and drop-off locations, you can add them here. These will default to every order created under this project, saving you from entering them each time.
#### Default Sites
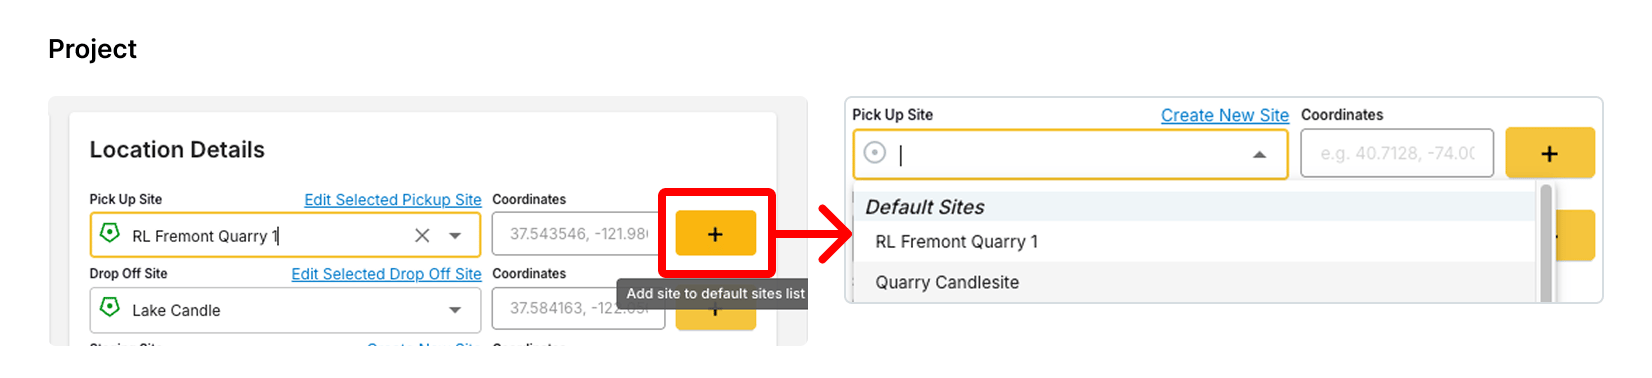
Make certain sites easily visible in the order form by using default sites.
1. Select a site, then click the + button
2. Open the sites menu, you'll see a "Default Sites" list
1. Note: Pick Up and Drop Off have their own Default Sites lists
***
### **Step 3: Pickup and Drop-Off Sites**
If you know your pickup and drop-off locations, you can add them here. These will default to every order created under this project, saving you from entering them each time.
#### Default Sites
Make certain sites easily visible in the order form by using default sites.
1. Select a site, then click the + button
2. Open the sites menu, you'll see a "Default Sites" list
1. Note: Pick Up and Drop Off have their own Default Sites lists
 #### What the site icons mean
The map draws a marker for every site so you can confirm the route at a glance. The marker's outline tells you whether a site is set for the order or only suggested.
| Marker style | Meaning |
| ------------------ | ---------------------------------------------------------------------------------------------------------------------------- |
| **Dotted outline** | A **Default Site** — suggested from the project's pickup or drop-off default list, not yet set on this order |
| **Solid outline** | A **set Pickup or Drop-Off site** — locked in for this order and used for routing and [geofences](/concepts/sites-geofences) |
#### What the site icons mean
The map draws a marker for every site so you can confirm the route at a glance. The marker's outline tells you whether a site is set for the order or only suggested.
| Marker style | Meaning |
| ------------------ | ---------------------------------------------------------------------------------------------------------------------------- |
| **Dotted outline** | A **Default Site** — suggested from the project's pickup or drop-off default list, not yet set on this order |
| **Solid outline** | A **set Pickup or Drop-Off site** — locked in for this order and used for routing and [geofences](/concepts/sites-geofences) |
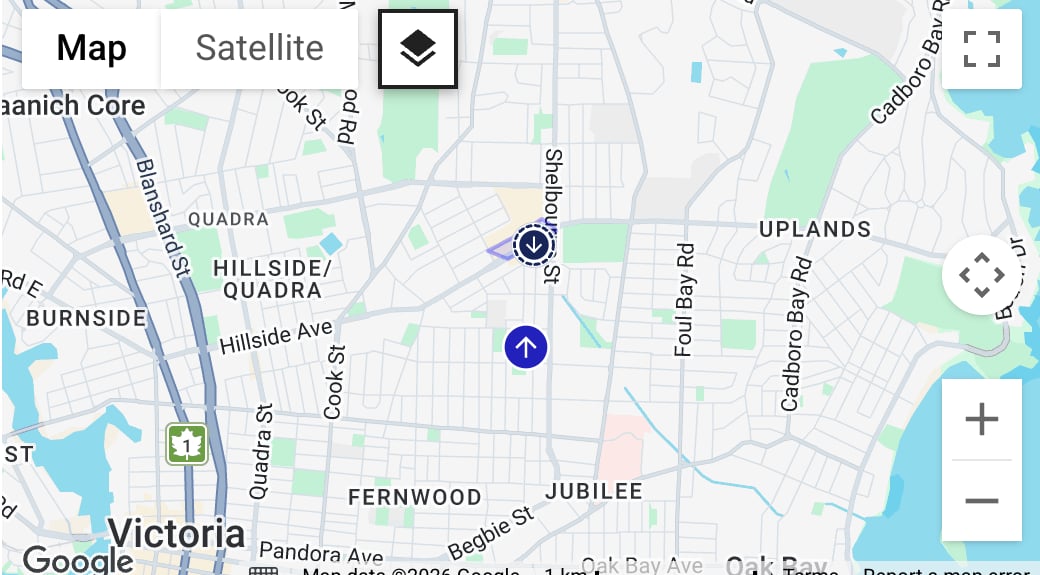 The icon inside the marker tells you the site's role:
| Icon | Site role |
| --------------- | ------------------- |
| **Up arrow** | Pickup |
| **Down arrow** | Drop-off |
| **Both arrows** | Pickup and drop-off |
| **Right arrow** | Staging |
***
### **Step 4: Materials & Material Rates**
Add the material(s) you will be hauling on this project, and associated rates. Set up once, and every order under the project prices its material automatically — no re-entry each day.
For each material:
* **Material** — pick from your [materials](/onboarding/master-data/materials) list (e.g., Gravel).
* **Total Quantity** and **Unit** — the amount ordered for the whole project (e.g., 1,000 tons).
#### Material Rates: buy and sell prices per site
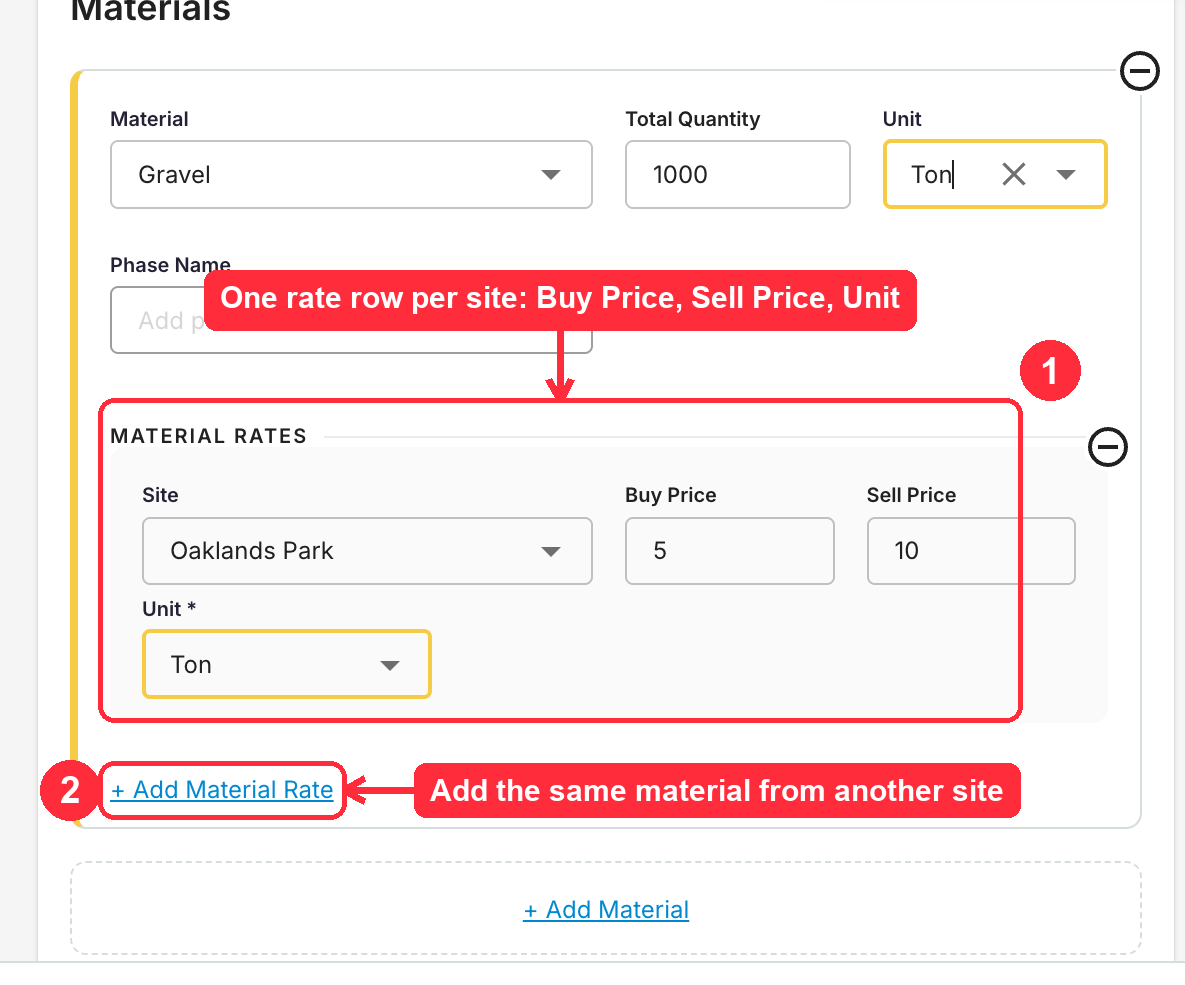
If you track material costs, click **+ Add Material Rate** to price the material. Each rate row holds a **Site**, a **Buy Price** (what you pay), a **Sell Price** (what you charge the customer), and a **Unit**.
The same material can carry a different price at each site — add one rate row per site with **+ Add Material Rate**:
| Site | Buy Price | Sell Price |
| --------------- | --------- | ---------- |
| Bayside Quarry | \$5/ton | \$10/ton |
| Montgomery Site | \$8/ton | \$12/ton |
The icon inside the marker tells you the site's role:
| Icon | Site role |
| --------------- | ------------------- |
| **Up arrow** | Pickup |
| **Down arrow** | Drop-off |
| **Both arrows** | Pickup and drop-off |
| **Right arrow** | Staging |
***
### **Step 4: Materials & Material Rates**
Add the material(s) you will be hauling on this project, and associated rates. Set up once, and every order under the project prices its material automatically — no re-entry each day.
For each material:
* **Material** — pick from your [materials](/onboarding/master-data/materials) list (e.g., Gravel).
* **Total Quantity** and **Unit** — the amount ordered for the whole project (e.g., 1,000 tons).
#### Material Rates: buy and sell prices per site
If you track material costs, click **+ Add Material Rate** to price the material. Each rate row holds a **Site**, a **Buy Price** (what you pay), a **Sell Price** (what you charge the customer), and a **Unit**.
The same material can carry a different price at each site — add one rate row per site with **+ Add Material Rate**:
| Site | Buy Price | Sell Price |
| --------------- | --------- | ---------- |
| Bayside Quarry | \$5/ton | \$10/ton |
| Montgomery Site | \$8/ton | \$12/ton |
 **On orders:** when an order under this project uses the material with a pickup site that has a rate row, Tread applies that site's buy and sell prices automatically. Change the pickup site on the order and the prices update to match the new site's rate row.
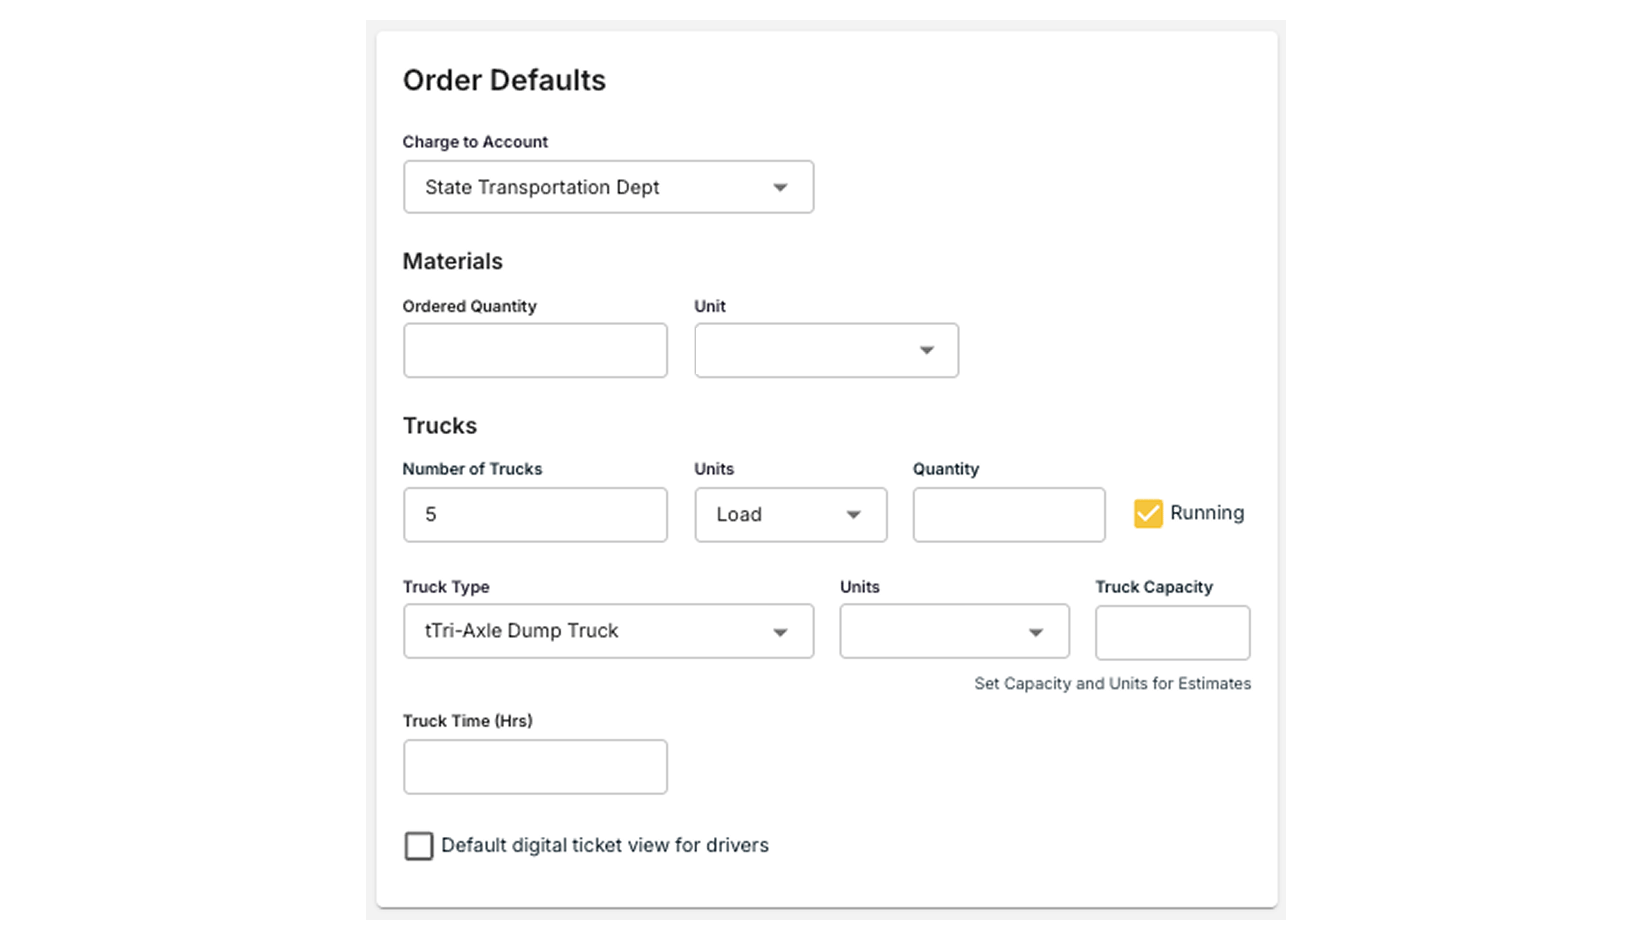
### **Step 5: Order Defaults**
These settings will pre-fill on every order created under this project:
* **Charge to Account** — Specify the account your drivers should charge to on-site. You can set this to match your customer account or leave it blank.
* **Quantity per Day** — Enter the expected tonnage or loads per day (e.g., 100 tons/day).
* **Trucks per Order** — Set how many trucks you expect per order (e.g., 5 trucks).
* **Quantity per Truck** — Set how much each truck will carry (e.g., 20 tons).
* **Units** — Switch between per ton or per load depending on your workflow. If set to per load, you can choose between a specific requested amount or running (which allows drivers to keep making trips without a set limit).
* **Truck Type** — Select a specific truck type if required (e.g., Tri-Axle Dump Truck). This helps Tread estimate how many loads are needed to reach the daily ordered quantity and also presets values on tickets.
* **Truck Work Duration** — Optionally define how long each truck should work.
**On orders:** when an order under this project uses the material with a pickup site that has a rate row, Tread applies that site's buy and sell prices automatically. Change the pickup site on the order and the prices update to match the new site's rate row.
### **Step 5: Order Defaults**
These settings will pre-fill on every order created under this project:
* **Charge to Account** — Specify the account your drivers should charge to on-site. You can set this to match your customer account or leave it blank.
* **Quantity per Day** — Enter the expected tonnage or loads per day (e.g., 100 tons/day).
* **Trucks per Order** — Set how many trucks you expect per order (e.g., 5 trucks).
* **Quantity per Truck** — Set how much each truck will carry (e.g., 20 tons).
* **Units** — Switch between per ton or per load depending on your workflow. If set to per load, you can choose between a specific requested amount or running (which allows drivers to keep making trips without a set limit).
* **Truck Type** — Select a specific truck type if required (e.g., Tri-Axle Dump Truck). This helps Tread estimate how many loads are needed to reach the daily ordered quantity and also presets values on tickets.
* **Truck Work Duration** — Optionally define how long each truck should work.
 ***
### **Step 6: Freight Rates and Tax**
Set rates and add ons for freight. For more info please refer to [this documentation](/workflows/billing/dynamic-rates).
* **Customer Rate** — The rate you CHARGE customers
* **Vendor Rate** — The rate you PAY vendors (e.g. brokers, haulers, OOs)
* **Driver Rate** — The rate you PAY internal drivers (i.e. company drivers)
#### Tax
You can apply a tax rate to the receivables invoice and choose which items it applies to.
1. Enter your tax rate (e.g., 8%).
2. Select whether the tax applies to freight and fuel surcharge rates, material rates, and/or add-ons.
***
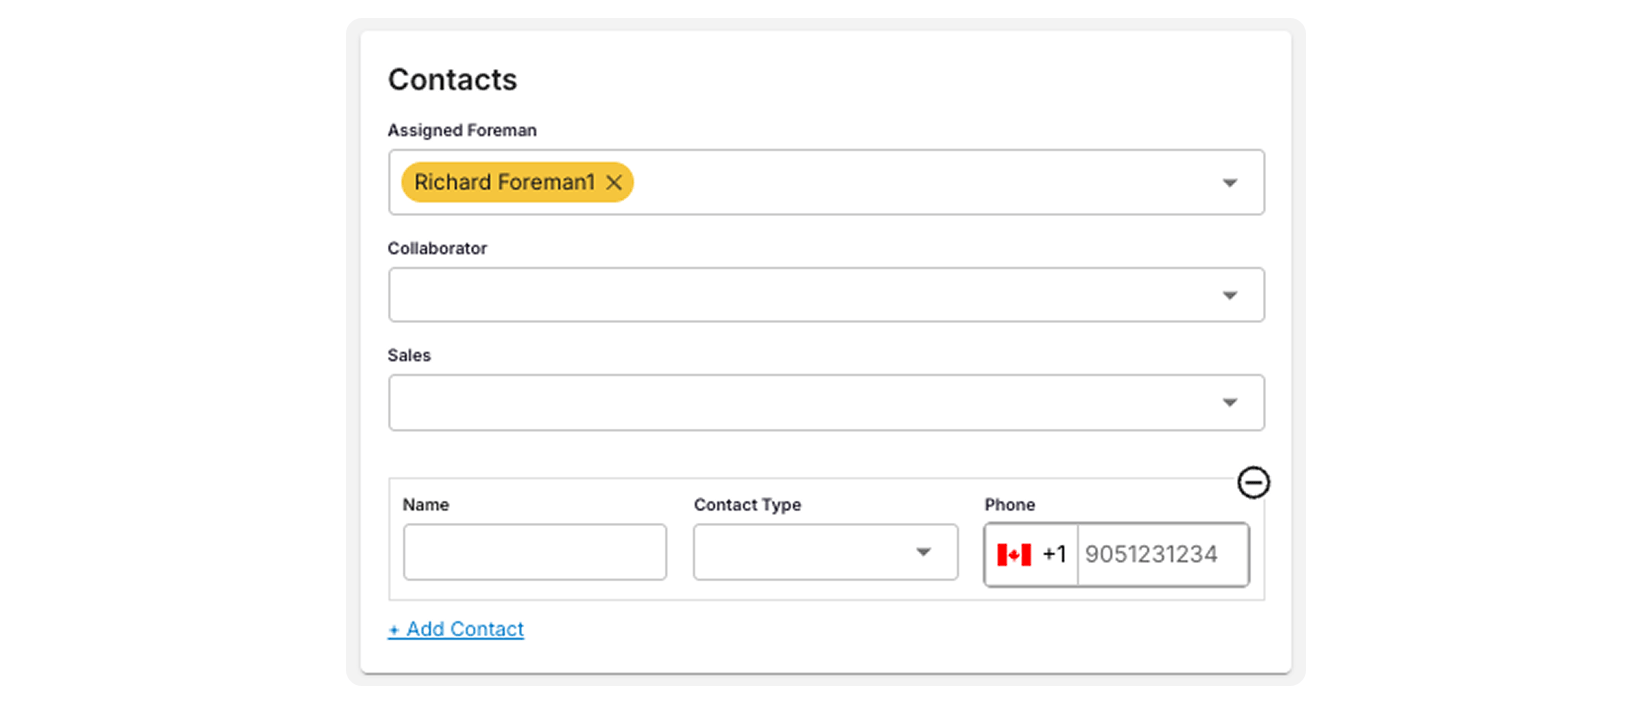
### **Step 7: Contacts**
Default contacts on the order. For example set the Foreman in charge of the project.
***
### **Step 6: Freight Rates and Tax**
Set rates and add ons for freight. For more info please refer to [this documentation](/workflows/billing/dynamic-rates).
* **Customer Rate** — The rate you CHARGE customers
* **Vendor Rate** — The rate you PAY vendors (e.g. brokers, haulers, OOs)
* **Driver Rate** — The rate you PAY internal drivers (i.e. company drivers)
#### Tax
You can apply a tax rate to the receivables invoice and choose which items it applies to.
1. Enter your tax rate (e.g., 8%).
2. Select whether the tax applies to freight and fuel surcharge rates, material rates, and/or add-ons.
***
### **Step 7: Contacts**
Default contacts on the order. For example set the Foreman in charge of the project.
 ***
### **Step 8: Attachments & Notes**
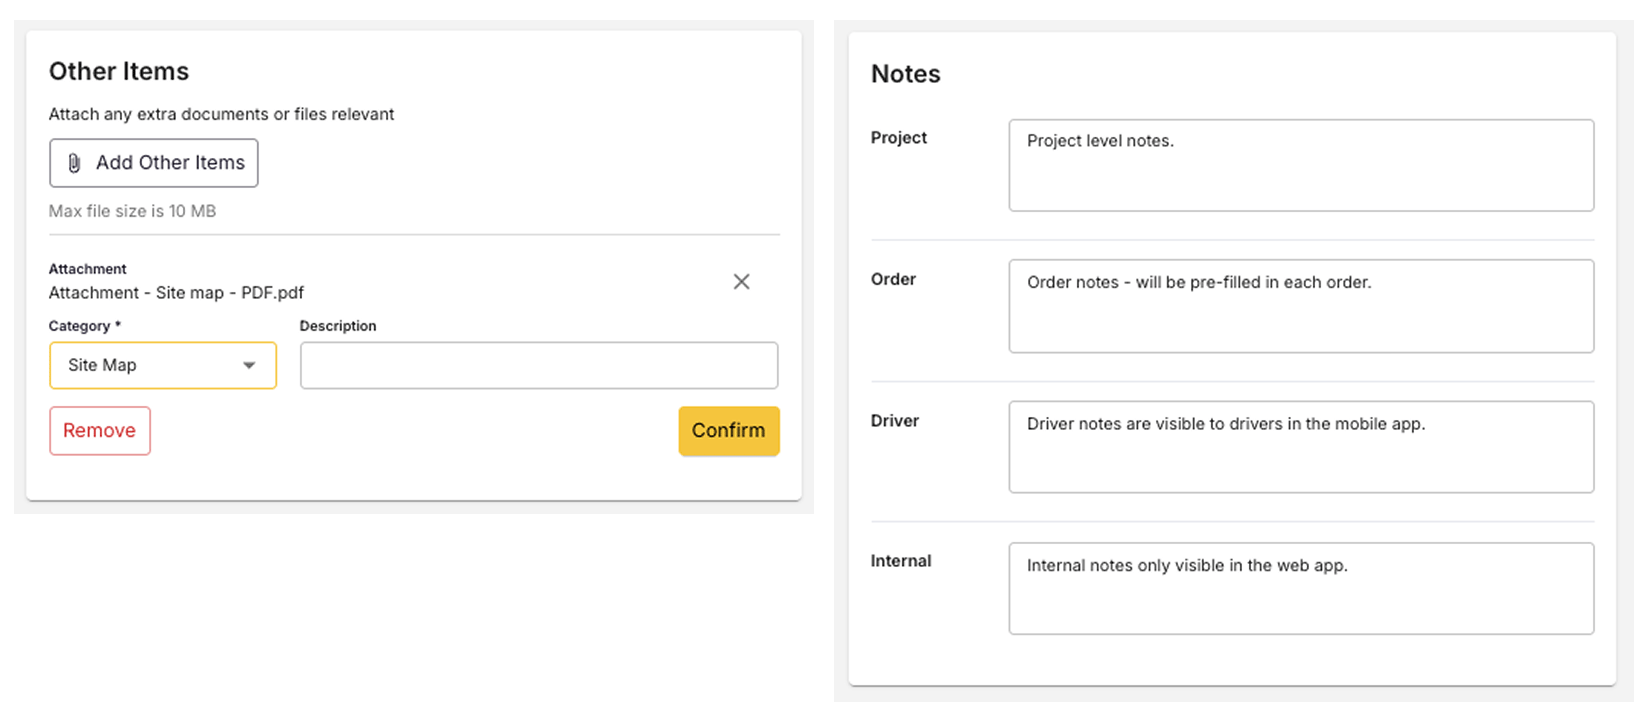
You can attach any relevant files to the project and add notes that will appear directly on the order.
Project files appear on every order in the project, and drivers see them in the driver app. To attach a file to one order only, see [Attach Files to an Order for Drivers](/workflows/order-attachments).
#### Notes
* **Project** - Visible in this Project and itsOrders
* **Order** - Visible in the order
* **Driver** - Drivers see these notes in the Driver App
* Internal - Visible in this Project and its Orders
***
### **Step 8: Attachments & Notes**
You can attach any relevant files to the project and add notes that will appear directly on the order.
Project files appear on every order in the project, and drivers see them in the driver app. To attach a file to one order only, see [Attach Files to an Order for Drivers](/workflows/order-attachments).
#### Notes
* **Project** - Visible in this Project and itsOrders
* **Order** - Visible in the order
* **Driver** - Drivers see these notes in the Driver App
* Internal - Visible in this Project and its Orders