> ## Documentation Index
> Fetch the complete documentation index at: https://docs.tread.ai/llms.txt
> Use this file to discover all available pages before exploring further.

# Add Equipment to a Vendor's Account

> Create a truck in a vendor's Tread account and share it back to yourself so you can dispatch it.

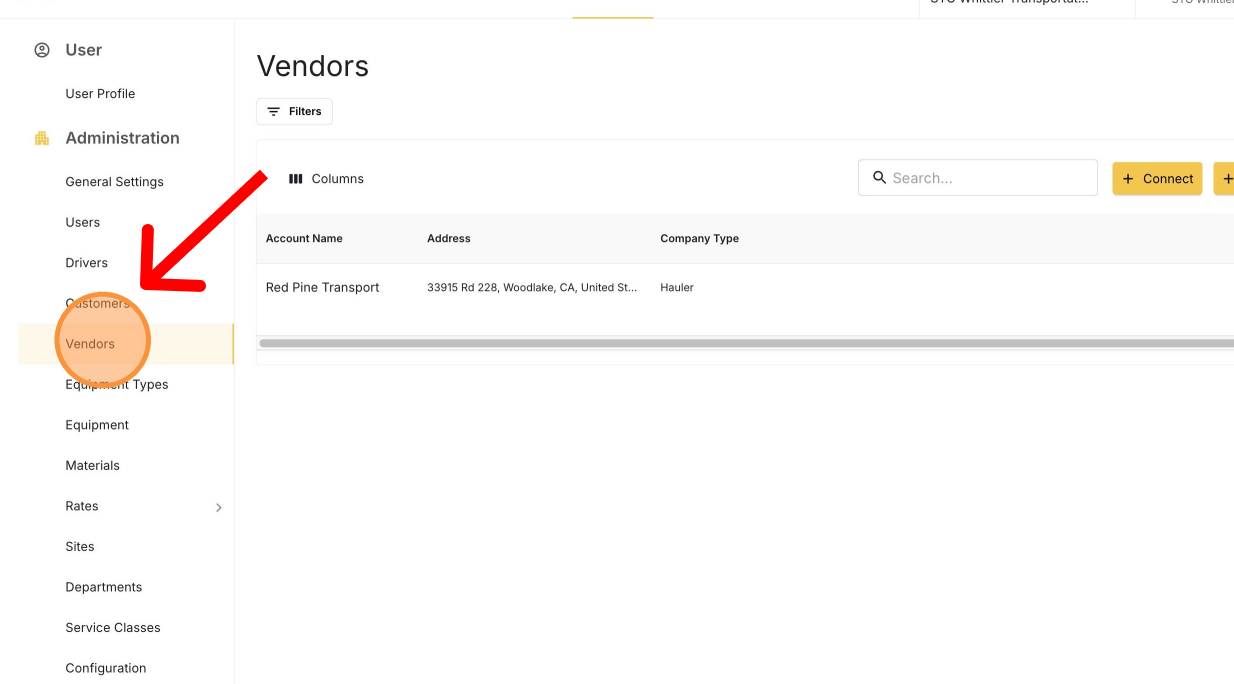
Add a truck to a [vendor's](/onboarding/master-data/vendors) account when the vendor has new equipment, or when you need dispatch access to a truck they already run.

## Add the truck
<Steps>
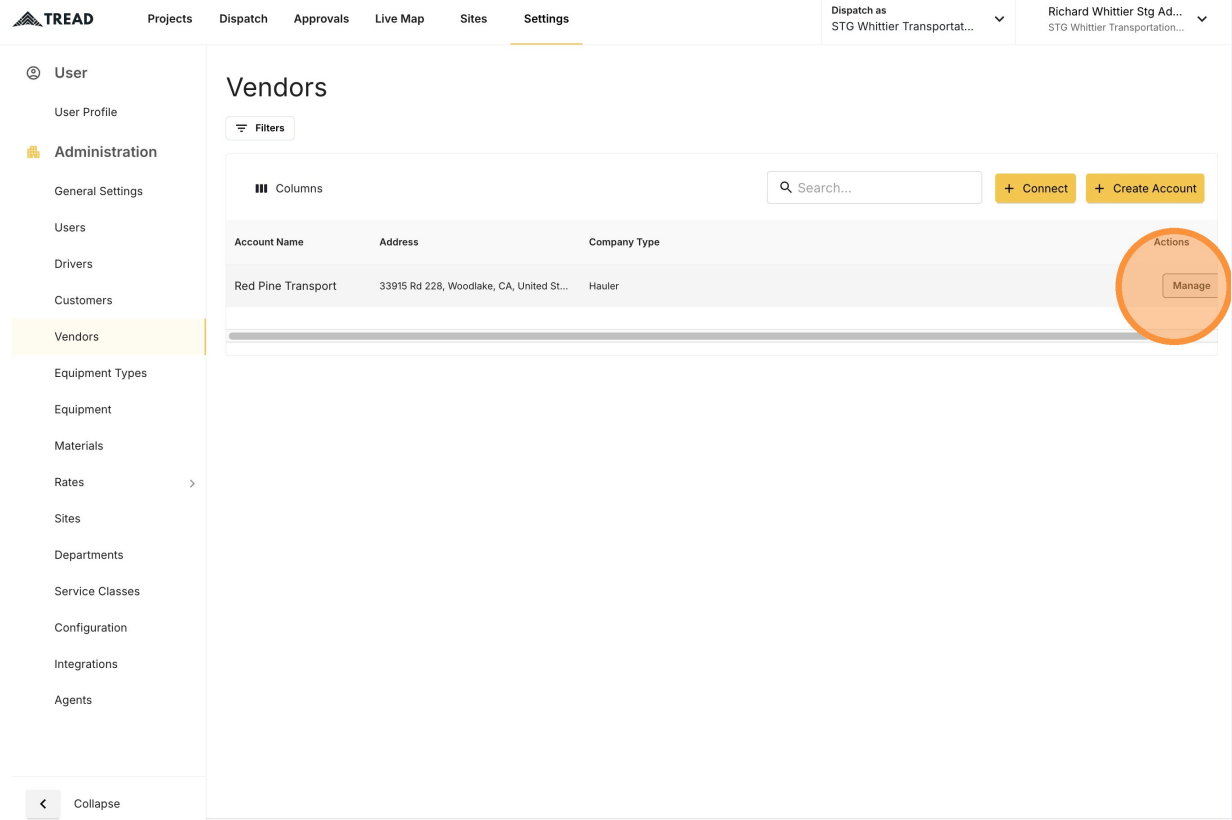
  <Step title="Open Settings → Vendors">
    <Frame>
      <img src="https://mintcdn.com/treadtechnologiesinc/z-gXukxyENJ5baPn/images/workflows/vendor-management/add-equipment-01.png?fit=max&auto=format&n=z-gXukxyENJ5baPn&q=85&s=e5080566c72b3bd807cf5a7709cee713" alt="The Vendors page under Settings" width="1234" height="684" data-path="images/workflows/vendor-management/add-equipment-01.png" />
    </Frame>
  </Step>

  <Step title="Click MANAGE on the vendor">
    <Frame>
      <img src="https://mintcdn.com/treadtechnologiesinc/z-gXukxyENJ5baPn/images/workflows/vendor-management/add-equipment-02.png?fit=max&auto=format&n=z-gXukxyENJ5baPn&q=85&s=5c842bb781be25b1ca65d48b492dd0be" alt="The MANAGE button on a vendor row" width="1232" height="820" data-path="images/workflows/vendor-management/add-equipment-02.png" />
    </Frame>

    <Note>
      No **MANAGE** button? Email [support@tread.io](mailto:support@tread.io) with the vendors you need to manage, or ask in the in-app chat.
    </Note>
  </Step>

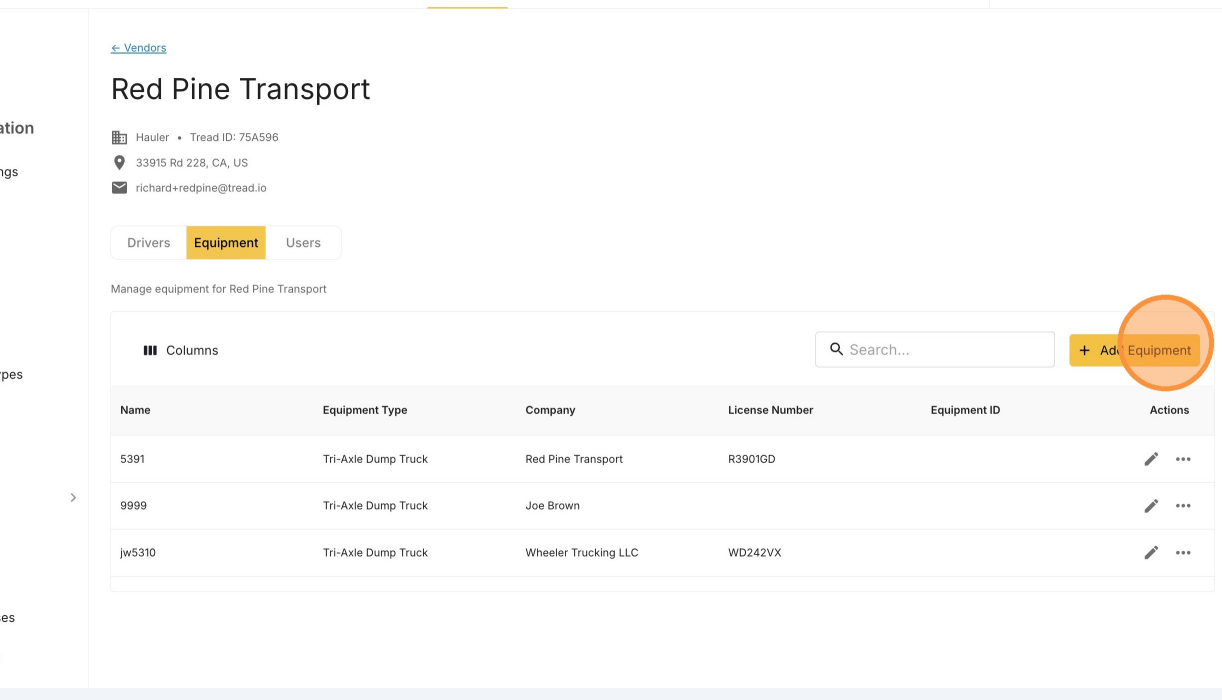
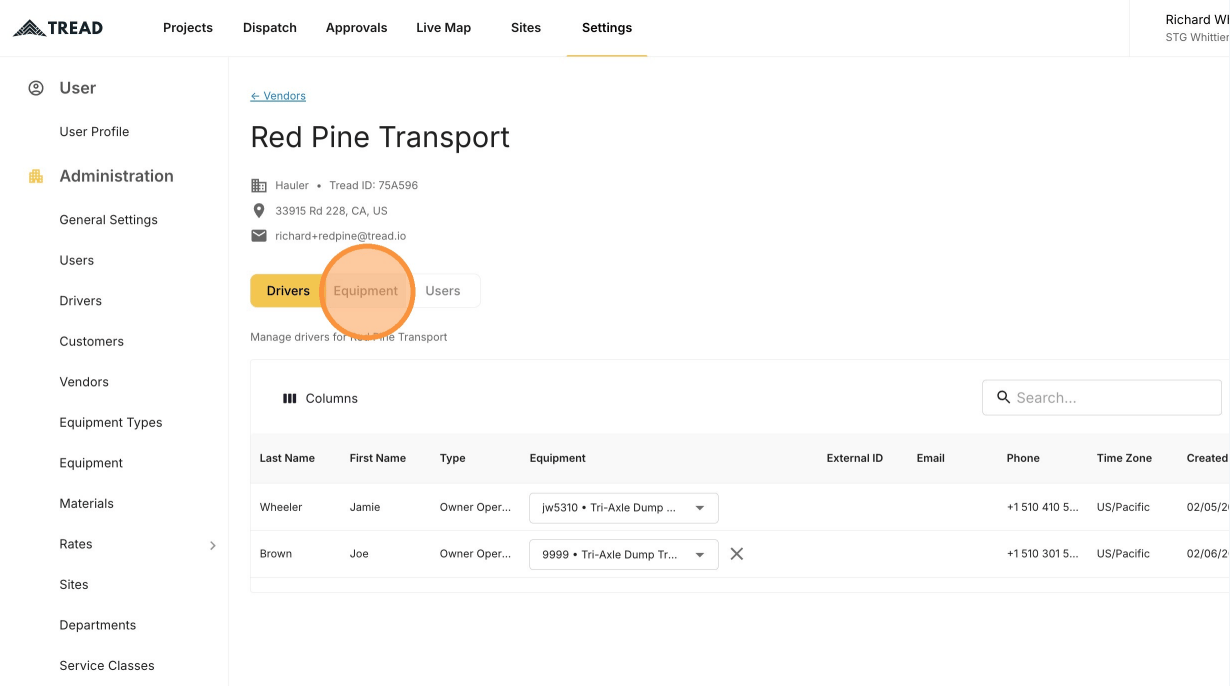
  <Step title="Open the Equipment tab">
    The Equipment tab lists every truck on the vendor's account.
    <Frame>
      <img src="https://mintcdn.com/treadtechnologiesinc/z-gXukxyENJ5baPn/images/workflows/vendor-management/add-equipment-03.png?fit=max&auto=format&n=z-gXukxyENJ5baPn&q=85&s=c4aa587816c0dde2bb4cf1d65b1b0ac9" alt="The Equipment tab on a vendor's management page" width="1230" height="686" data-path="images/workflows/vendor-management/add-equipment-03.png" />
    </Frame>
  </Step>

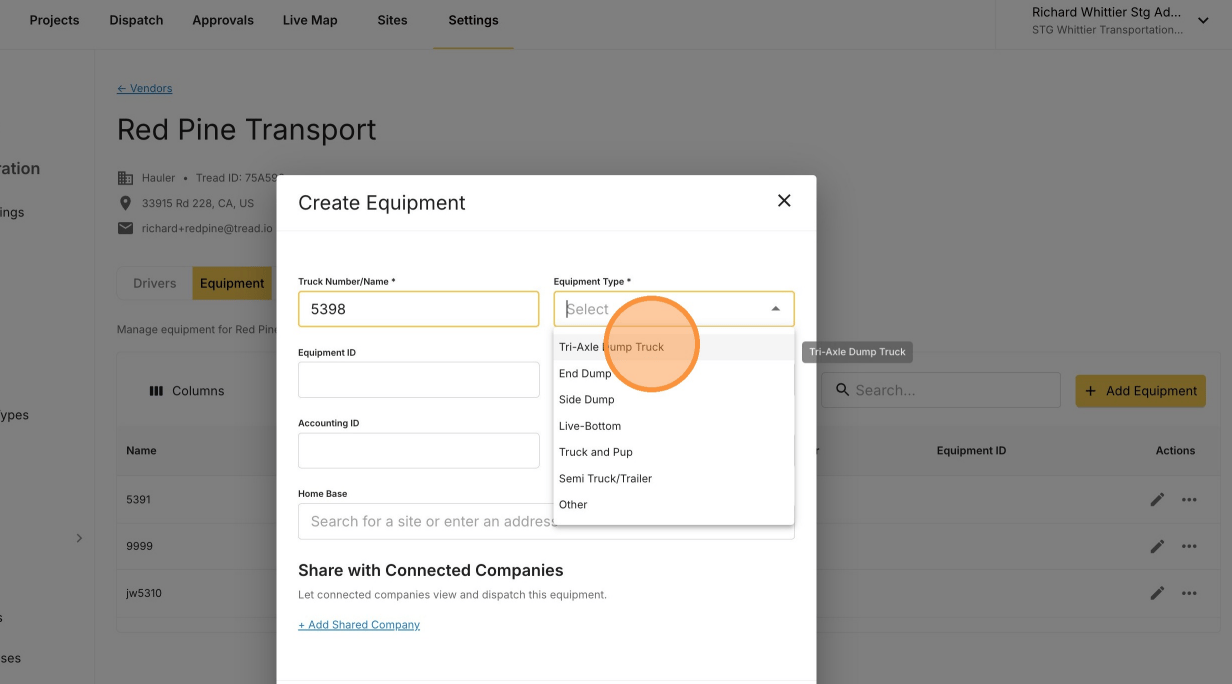
  <Step title="Click Add Equipment">
    <Frame>
      <img src="https://mintcdn.com/treadtechnologiesinc/z-gXukxyENJ5baPn/images/workflows/vendor-management/add-equipment-04.png?fit=max&auto=format&n=z-gXukxyENJ5baPn&q=85&s=c0664ad1b7579643478679d45fb60f66" alt="The Add Equipment button above the vendor's equipment table" width="1222" height="700" data-path="images/workflows/vendor-management/add-equipment-04.png" />
    </Frame>
  </Step>

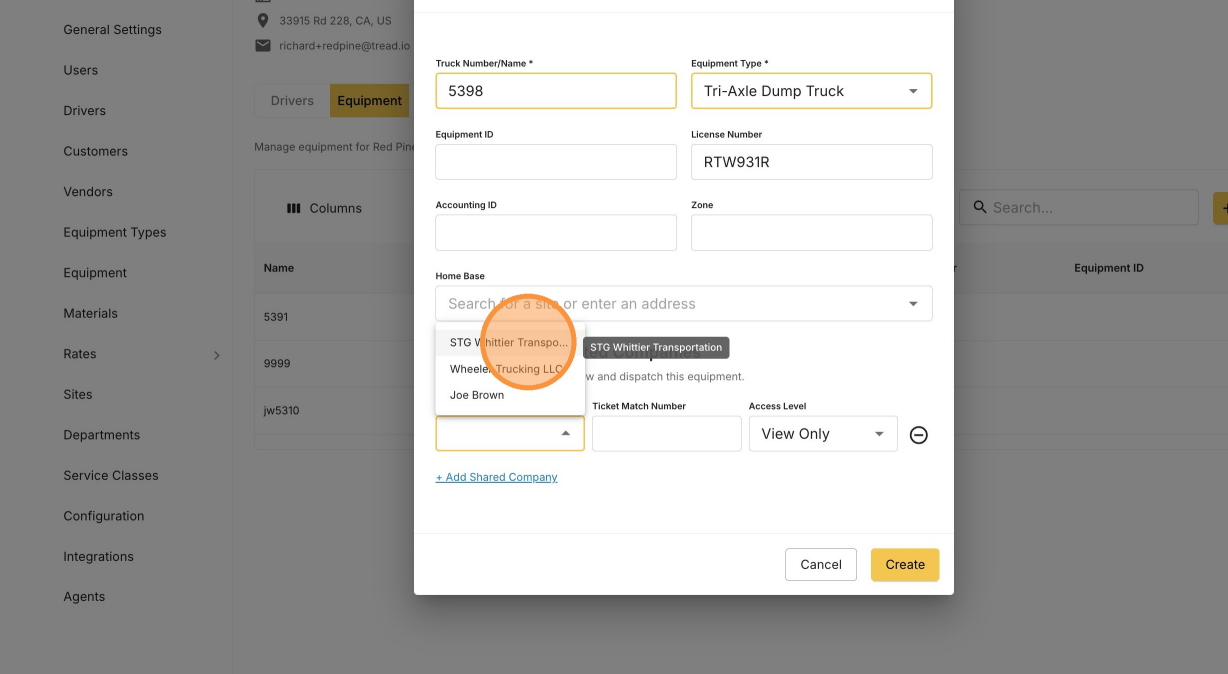
  <Step title="Enter the truck number and equipment type">
    <Frame>
      <img src="https://mintcdn.com/treadtechnologiesinc/z-gXukxyENJ5baPn/images/workflows/vendor-management/add-equipment-05.png?fit=max&auto=format&n=z-gXukxyENJ5baPn&q=85&s=9410f15171cc40d031afdc46ffca9ec2" alt="The new equipment form with truck number and equipment type fields" width="1232" height="684" data-path="images/workflows/vendor-management/add-equipment-05.png" />
    </Frame>
  </Step>
</Steps>

## Share the truck to your company

<Warning>
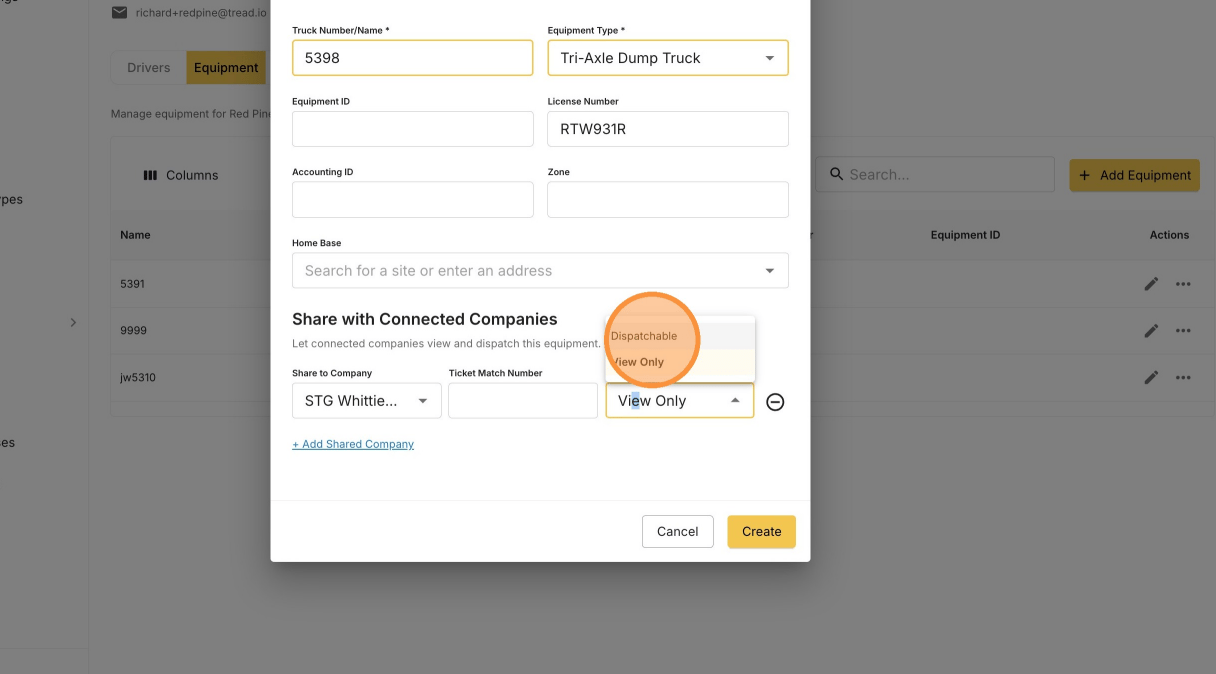
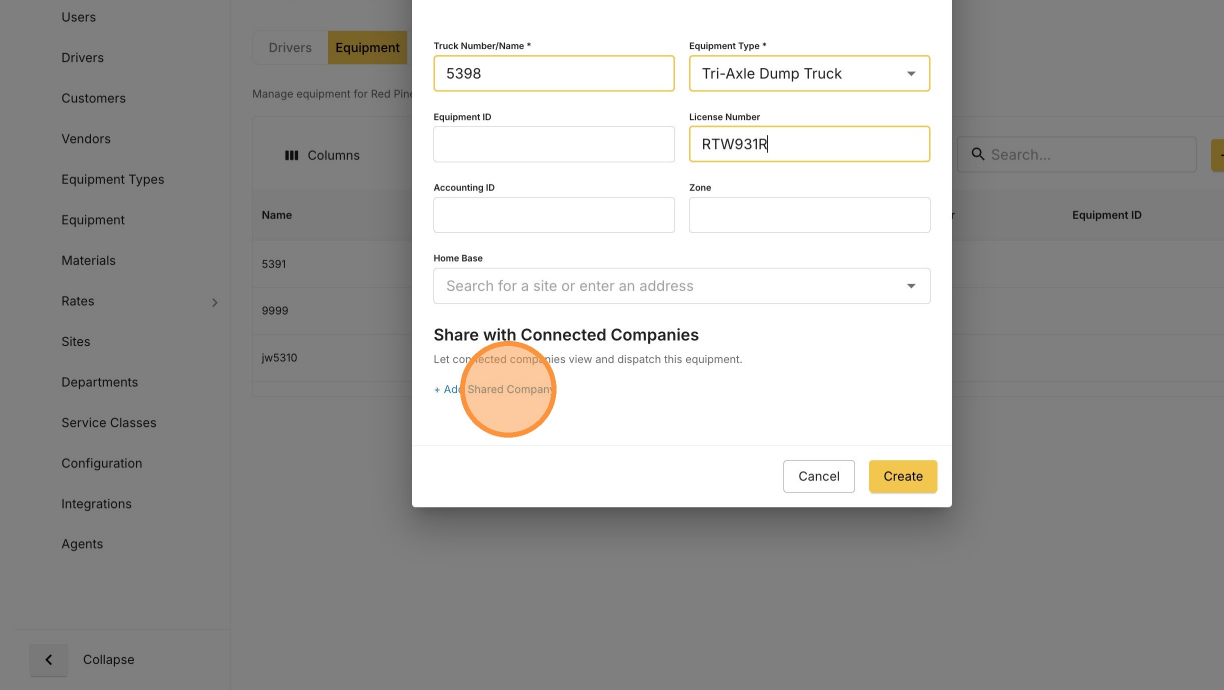
  Share the truck to **your** company, or you won't be able to dispatch it.
</Warning>

<Steps>
  <Step title="Click + Add Shared Company">
    <Frame>
      <img src="https://mintcdn.com/treadtechnologiesinc/z-gXukxyENJ5baPn/images/workflows/vendor-management/add-equipment-06.png?fit=max&auto=format&n=z-gXukxyENJ5baPn&q=85&s=f356654dd969b9dd4dd0f13e318921b6" alt="The Add Shared Company control on the equipment form" width="1224" height="690" data-path="images/workflows/vendor-management/add-equipment-06.png" />
    </Frame>
  </Step>

  <Step title="Select your company">
    <Frame>
      <img src="https://mintcdn.com/treadtechnologiesinc/z-gXukxyENJ5baPn/images/workflows/vendor-management/add-equipment-07.png?fit=max&auto=format&n=z-gXukxyENJ5baPn&q=85&s=3af1065f99a305bf9c87d2e97a3c1162" alt="Selecting your own company in the shared company picker" width="1228" height="674" data-path="images/workflows/vendor-management/add-equipment-07.png" />
    </Frame>
  </Step>

  <Step title="Set the access level to Dispatchable">
    <Frame>
      <img src="https://mintcdn.com/treadtechnologiesinc/z-gXukxyENJ5baPn/images/workflows/vendor-management/add-equipment-08.png?fit=max&auto=format&n=z-gXukxyENJ5baPn&q=85&s=8d5e713b74282f380c22012c30be9bab" alt="Setting the share access level to Dispatchable" width="1216" height="674" data-path="images/workflows/vendor-management/add-equipment-08.png" />
    </Frame>
  </Step>

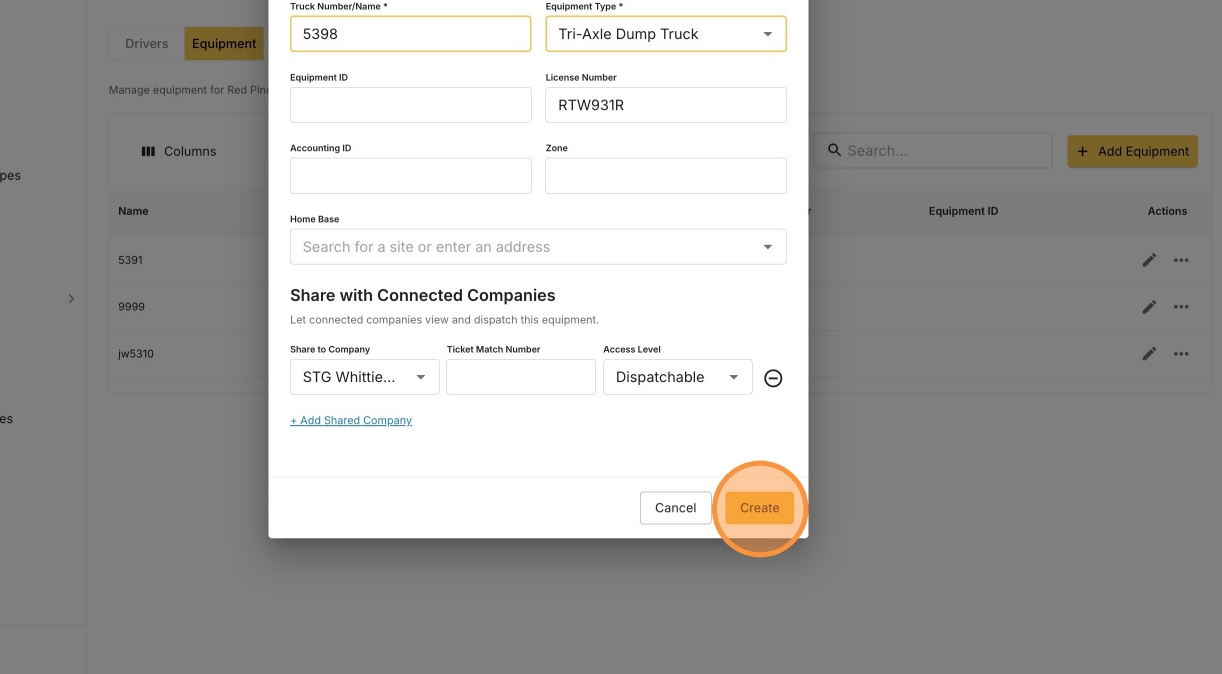
  <Step title="Click Create">
    <Frame>
      <img src="https://mintcdn.com/treadtechnologiesinc/z-gXukxyENJ5baPn/images/workflows/vendor-management/add-equipment-09.png?fit=max&auto=format&n=z-gXukxyENJ5baPn&q=85&s=60dfe9320b4bc53740b4cb3e7128d882" alt="The Create button on the equipment form" width="1222" height="674" data-path="images/workflows/vendor-management/add-equipment-09.png" />
    </Frame>

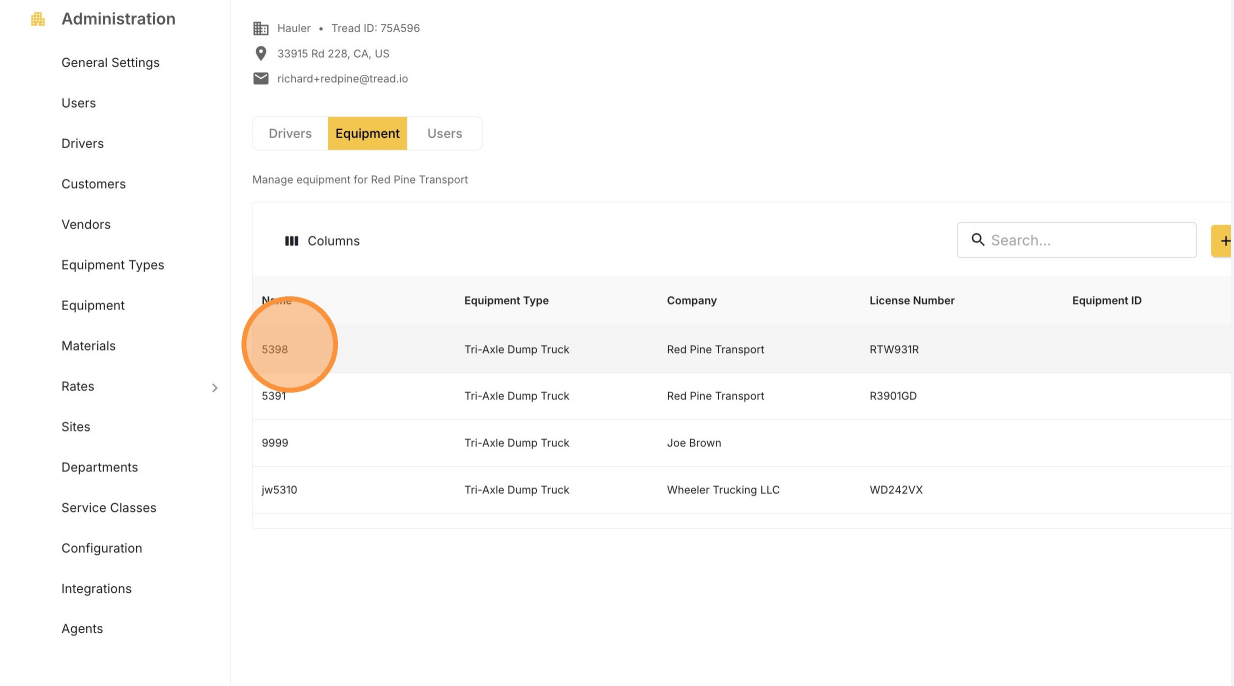
    The new truck appears in the vendor's equipment table.
    <Frame>
      <img src="https://mintcdn.com/treadtechnologiesinc/z-gXukxyENJ5baPn/images/workflows/vendor-management/add-equipment-10.png?fit=max&auto=format&n=z-gXukxyENJ5baPn&q=85&s=046c4b868d09adb84bc6b8c9efdd4daf" alt="The newly added truck listed in the vendor's equipment table" width="1234" height="686" data-path="images/workflows/vendor-management/add-equipment-10.png" />
    </Frame>
  </Step>
</Steps>

## Assign the truck to the vendor's driver

<Steps>
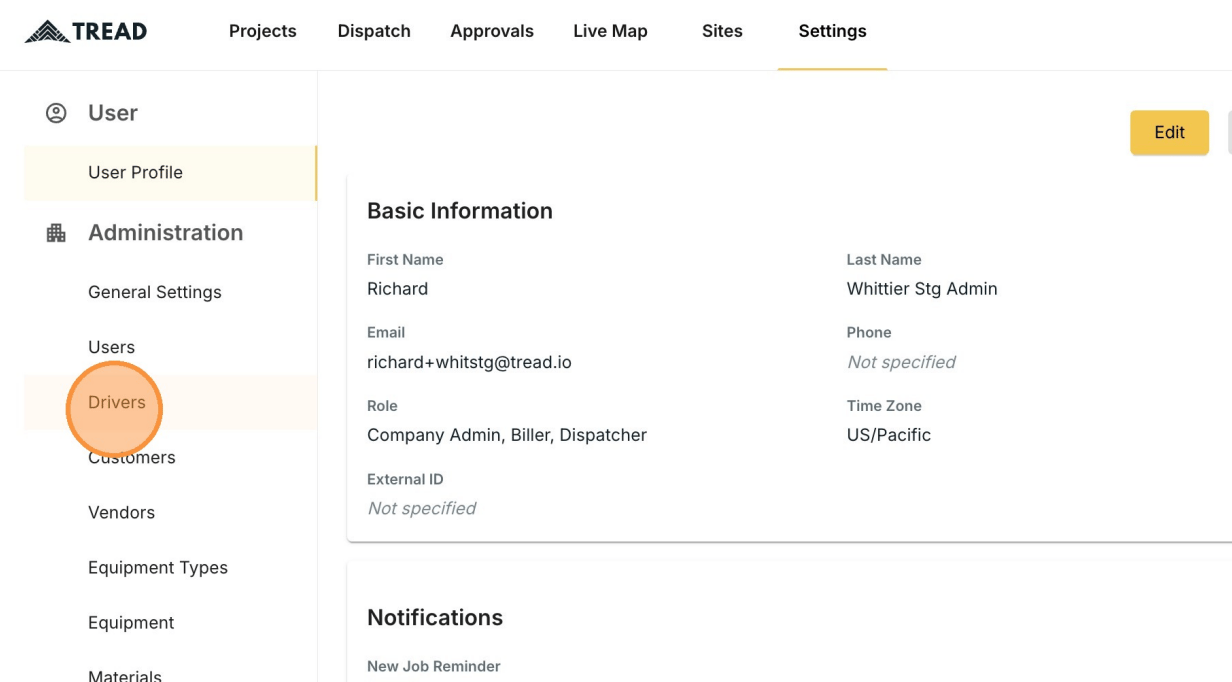
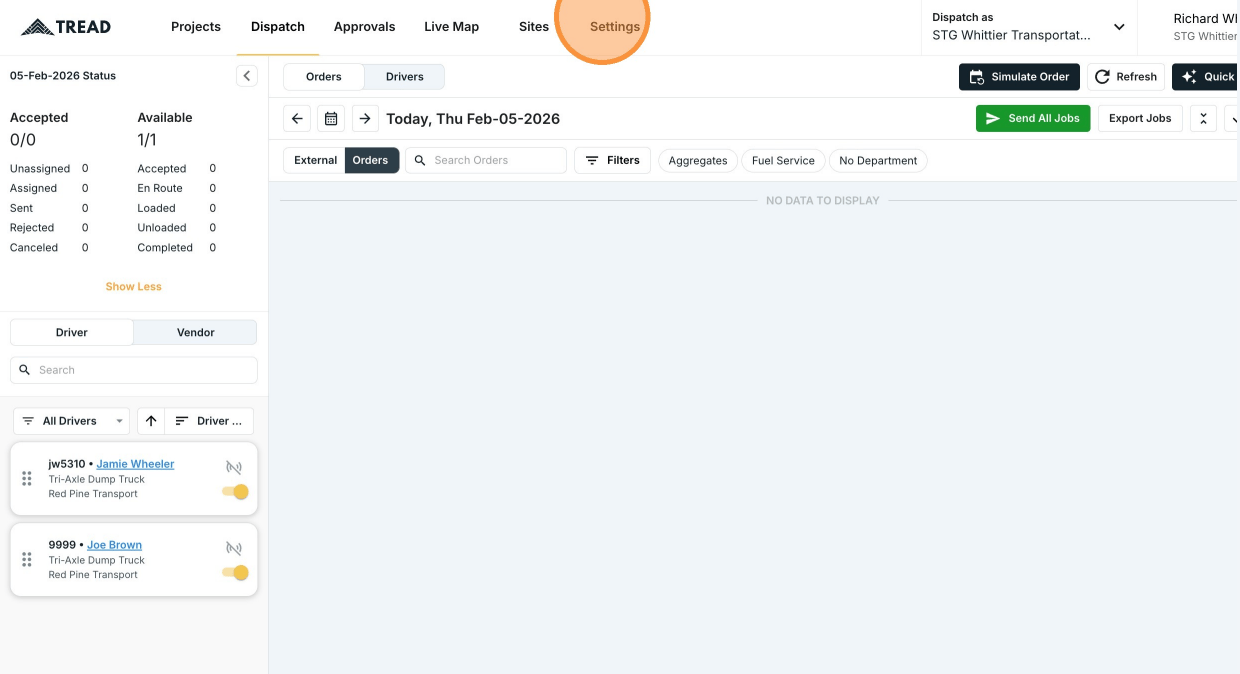
  <Step title="Open Settings → Drivers">
    This is your own driver list, including drivers shared to you.
    <Frame>
      <img src="https://mintcdn.com/treadtechnologiesinc/z-gXukxyENJ5baPn/images/workflows/vendor-management/add-equipment-11.png?fit=max&auto=format&n=z-gXukxyENJ5baPn&q=85&s=2dd009500d301ab0385054091a2e6afd" alt="Opening Settings" width="1240" height="674" data-path="images/workflows/vendor-management/add-equipment-11.png" />
    </Frame>

    <Frame>
      <img src="https://mintcdn.com/treadtechnologiesinc/z-gXukxyENJ5baPn/images/workflows/vendor-management/add-equipment-12.png?fit=max&auto=format&n=z-gXukxyENJ5baPn&q=85&s=0dca7ae9170ee9ce85b119cfe0230e90" alt="The Drivers list under Settings" width="1232" height="682" data-path="images/workflows/vendor-management/add-equipment-12.png" />
    </Frame>
  </Step>

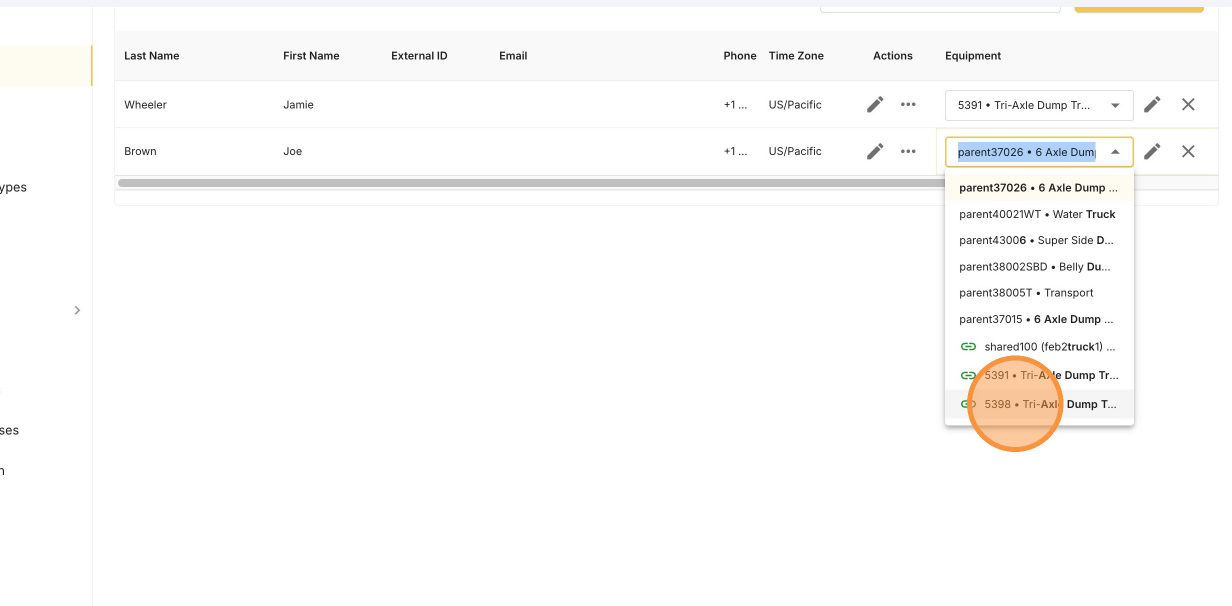
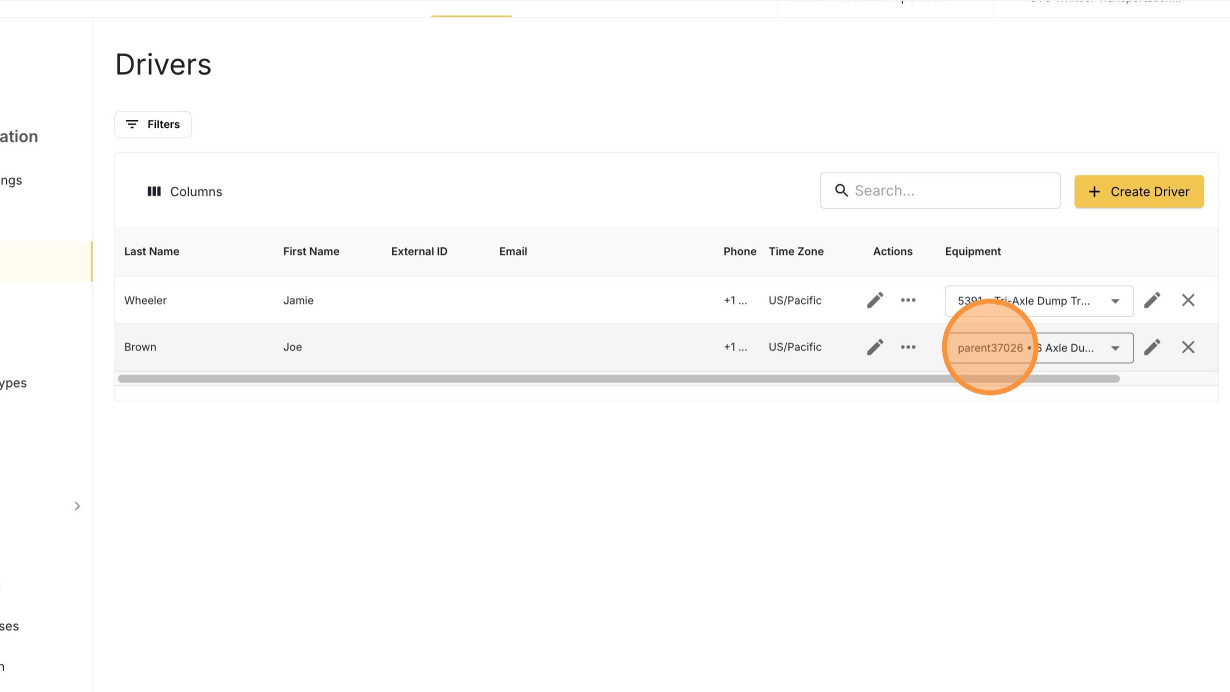
  <Step title="Pick the truck in the Select Truck field">
    Choose the driver's row, then set the truck you just added.
    <Frame>
      <img src="https://mintcdn.com/treadtechnologiesinc/z-gXukxyENJ5baPn/images/workflows/vendor-management/add-equipment-13.png?fit=max&auto=format&n=z-gXukxyENJ5baPn&q=85&s=0a4fb682bdba4bab0dd262be7f165b14" alt="The Select Truck field on a driver row" width="1230" height="692" data-path="images/workflows/vendor-management/add-equipment-13.png" />
    </Frame>

    <Frame>
      <img src="https://mintcdn.com/treadtechnologiesinc/z-gXukxyENJ5baPn/images/workflows/vendor-management/add-equipment-14.png?fit=max&auto=format&n=z-gXukxyENJ5baPn&q=85&s=c75bc9453bc37606dad2425968539f3d" alt="The truck selected for the driver" width="1232" height="606" data-path="images/workflows/vendor-management/add-equipment-14.png" />
    </Frame>
  </Step>

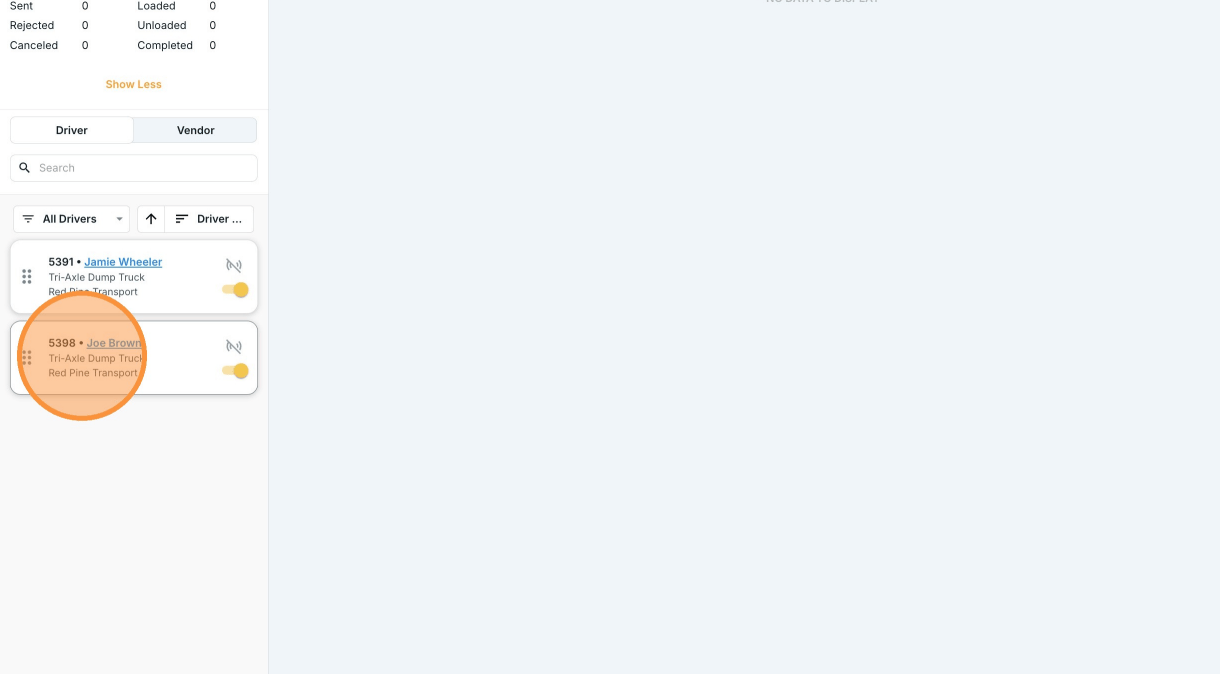
  <Step title="Confirm on the Dispatch board">
    The driver now shows with their assigned truck.
    <Frame>
      <img src="https://mintcdn.com/treadtechnologiesinc/z-gXukxyENJ5baPn/images/workflows/vendor-management/add-equipment-15.png?fit=max&auto=format&n=z-gXukxyENJ5baPn&q=85&s=4f0a9890babd8172ebd79a956fff135e" alt="The Dispatch board showing the driver assigned to the new truck" width="1220" height="674" data-path="images/workflows/vendor-management/add-equipment-15.png" />
    </Frame>
  </Step>
</Steps>

## Related

* [Edit & Delete Equipment from a Vendor's Account](/workflows/vendor-management/edit-equipment)
* [Add Drivers to a Vendor's Account](/workflows/vendor-management/add-drivers)
* [Equipment](/concepts/equipment)